
Bootstrap is the most popular web framework for developing responsive, mobile first web applications. Bootstrap is a front-end framework that is used to create the visible part of the website
ASP.NET is a server-side web application framework to help you produce dynamic web pages.
Getting Started
For developing with ASP.NET you would need Visual Studio IDE. Visual Studio is not an open source platform. However, Visual Studio IDE can be downloaded in three different versions. Visual Studio Community is a free IDE that you can use if you are a student or an open source developer. The other two versions Visual Studio Professional and Visual Studio Enterprise are not free.
Once you have installed the IDE on your system, You can get started with creating a new project.
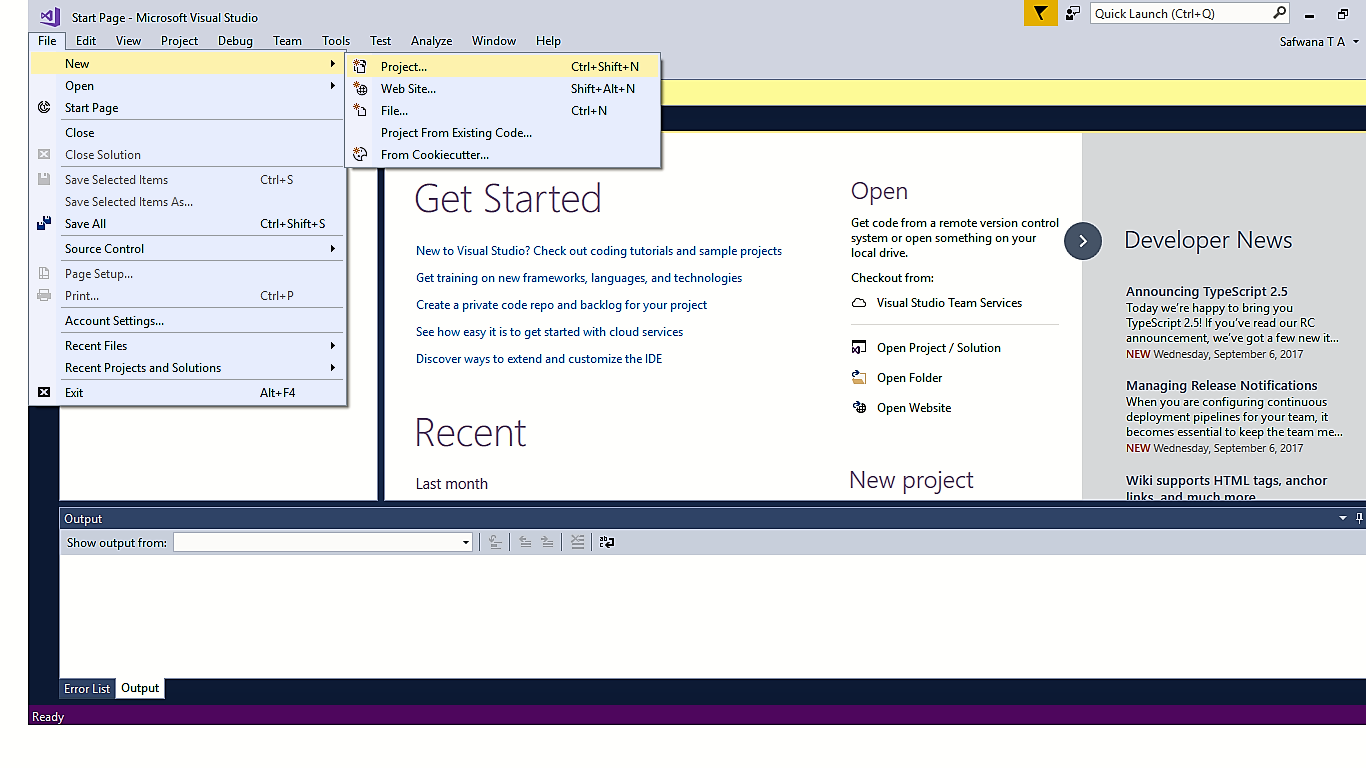
First, go to files menu in the toolbar. From files go to new and then project to create a new project.
This will open a new project window as shown below.
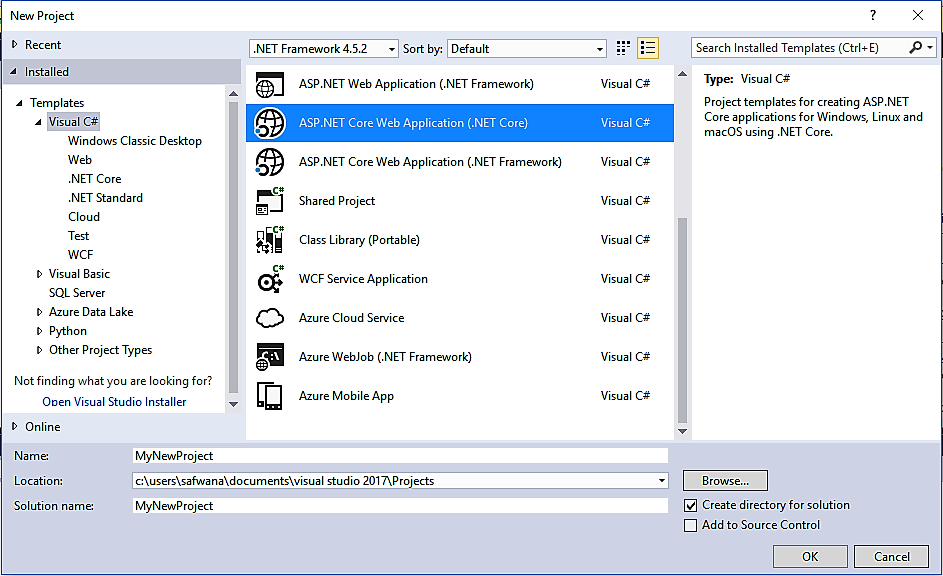
From the new project dialog box, select ASP.NET Core Web Application (.NET Core). Name your project and then click OK. I have created a project called MyNewProject.
Then you will see another dialog box for ASP.NET Core Web Application from where you can select ASP.NET Core Templates.
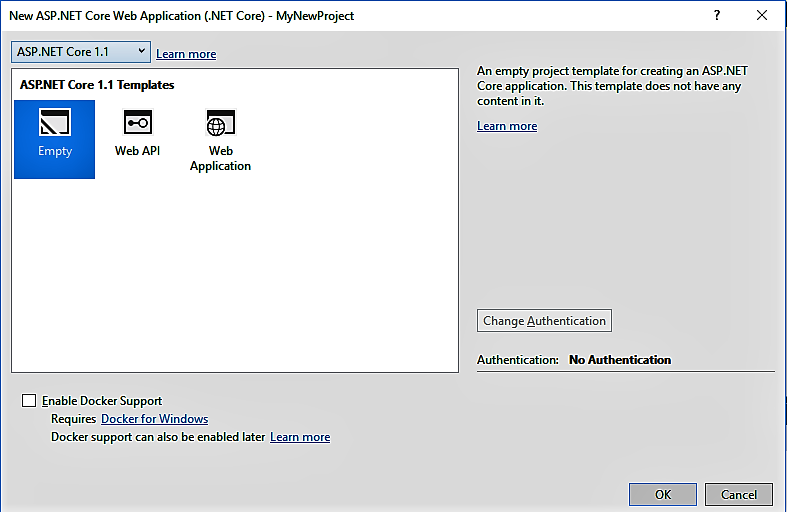
Select the empty template and then click OK. This will create a new project for you.
Adding Bootstrap to the Project
Let’s add Bootstrap to this project.
There are multiple ways to do it.
Manage Bower Packages
Go to project menu, and click on Manage Bower Packages.
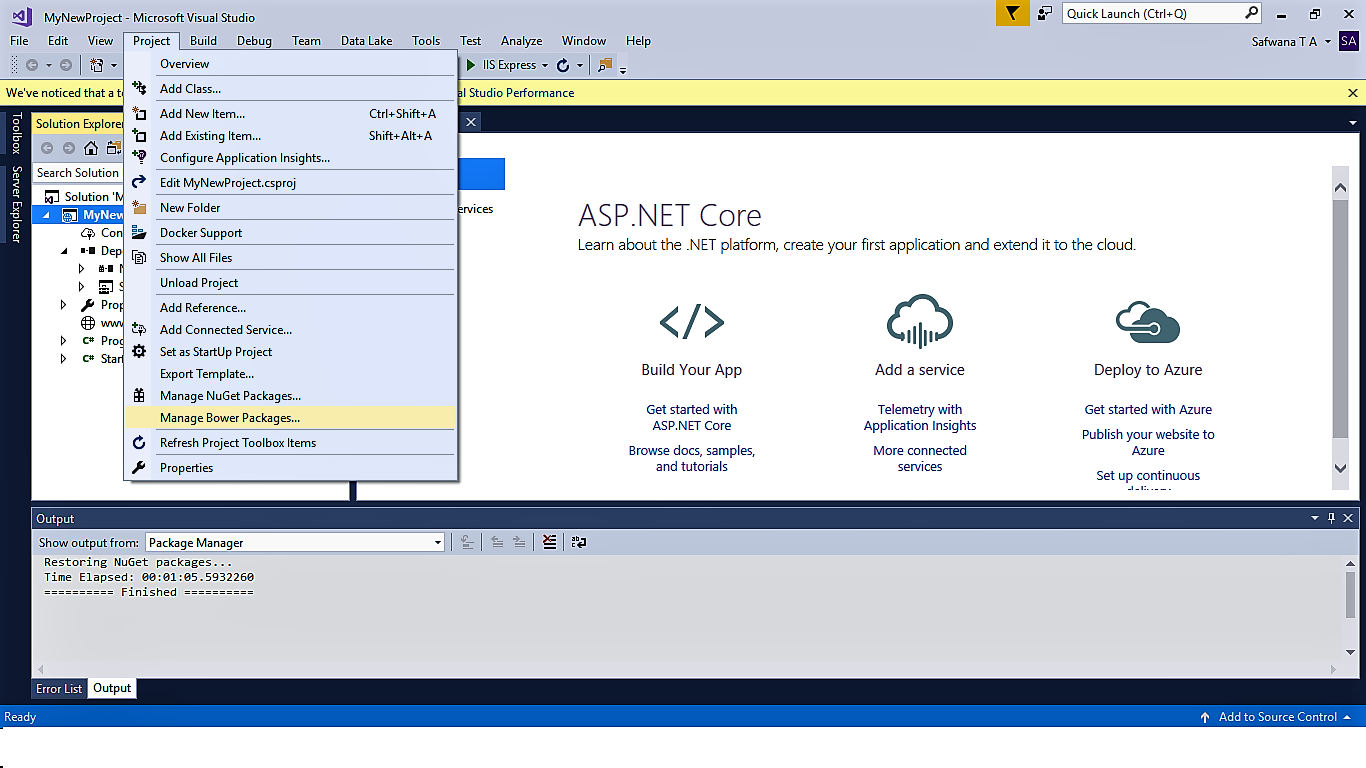
From there you can browse Bootstrap.
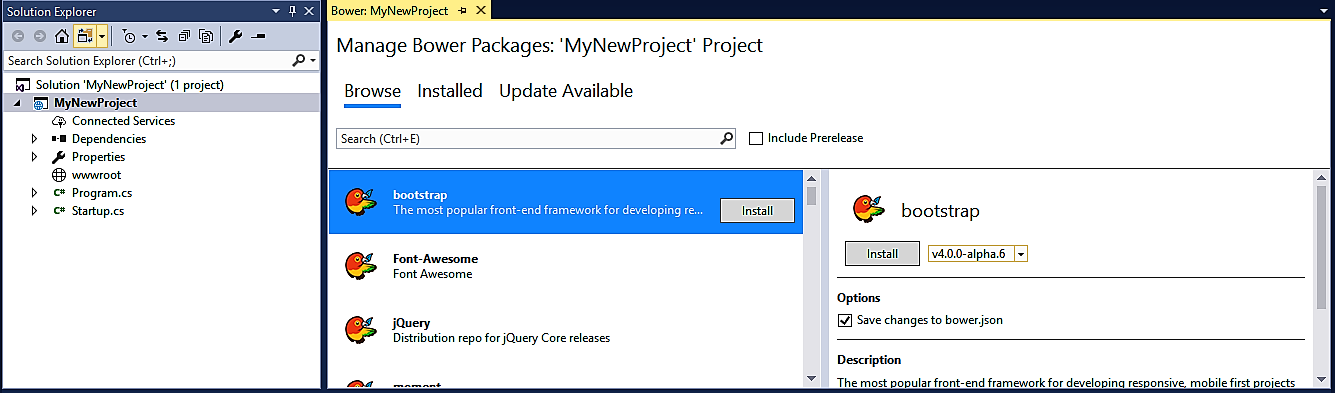
Visual Studio 2015 adds Bootstrap 3 to the project. In order to use Bootstrap 4 in your ASP.NET project, you will need to create an empty ASP.NET project and add the Bootstrap 4 files manually.
Also, Through this method, you can only add Bootstrap 4 alpha 6 at the moment. You can add the latest version of Bootstrap, Bootstrap 4 beta by adding a dependency in bower.json file.
Add Dependency in Bower.json
This is the recommended way of adding Bootstrap into an ASP.NET Core project
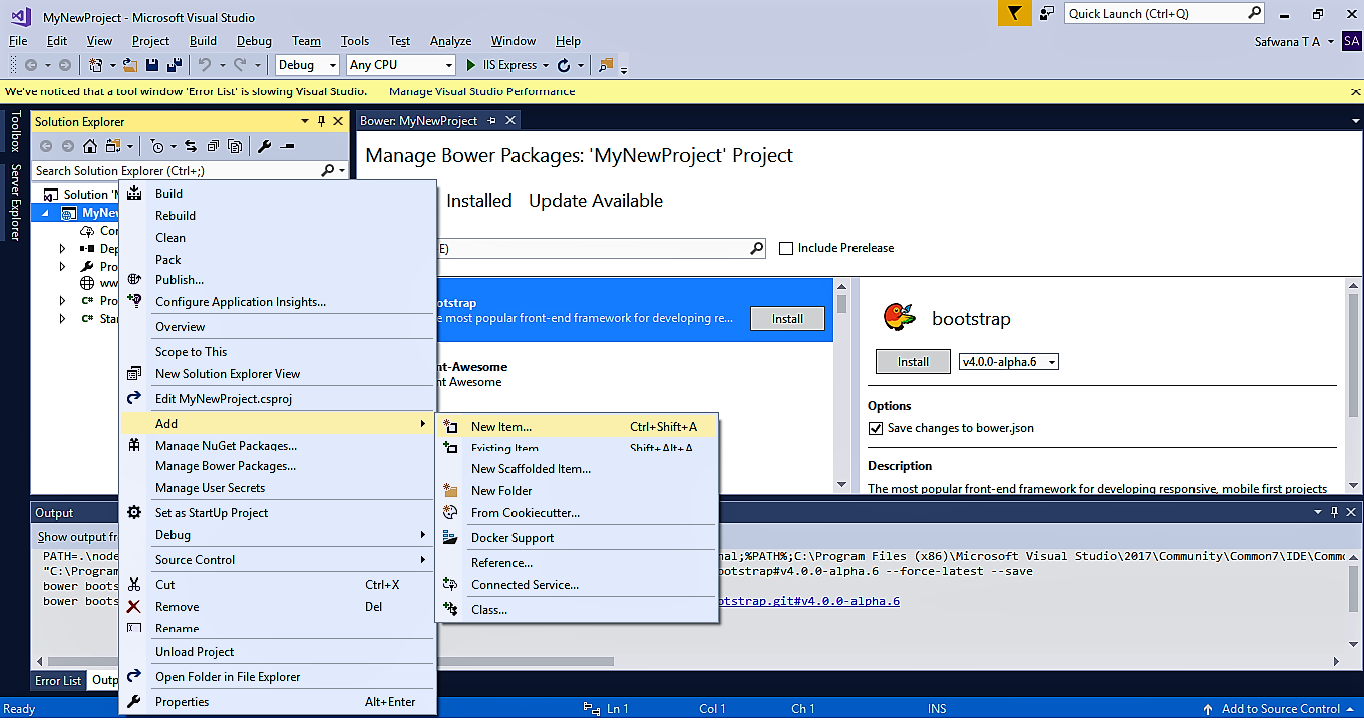
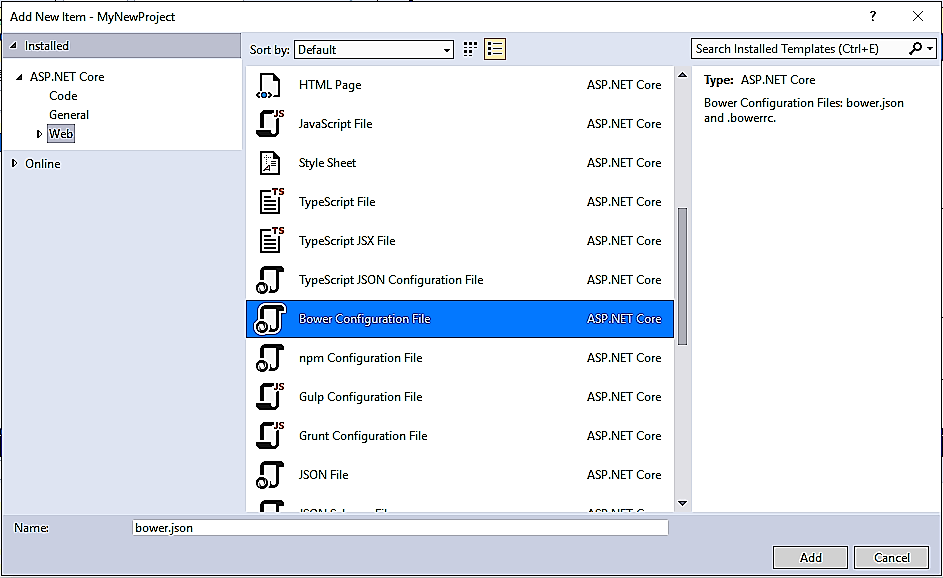
Go to the project name, right click and then add a new item. Under Web, double click and add Bower Configuration file.
This will add a new file to your project called bower.json.
If not already open, double-click on the bower.json file and add Bootstrap and version number to the dependency array. The code looks like the following.
{
"name": "asp.net",
"private": true,
"dependencies": {
"bootstrap": "v4.0.0-beta"
}
}
After adding the dependency, save the bower.json file and the Bootstrap 4 will start downloading and will be added to your project. The Bootstrap source code file will be downloaded in the lib folder.
Bootstrap 4 beta has jQuery and Popper.js as peer dependencies. So those will be downloaded along with Bootstrap.
Download Bootstrap On Your Computer
If you want to add Bootstrap 4 into your project from your local computer, you can do so as well. Go to the official Bootstrap website and download Bootstrap. But you will have to use Bootstrap 4 CDN in production.
Now we need to enable MVC and Static files.
Enabling MVC and Static Files
In order to be able to serve static files and enable MVC the following steps has to be performed.
First, right click on the project name, MyNewProject, and then click on edit mynewproject.csproj. Then add dependencies as follows.
<ItemGroup>
  <PackageReference Include="Microsoft.AspNetCore.Mvc" Version="1.0.0" />
  <PackageReference Include="Microsoft.AspNetCore.StaticFiles" Version="1.0.0" />
</ItemGroup>
Note: In Visual Studio 2015, these dependencies are to be added in the project.json files. Save the project.json files after adding the following lines in the dependency section.
"Microsoft.AspNetCore.Mvc": "1.0.0",

"Microsoft.AspNetCore.StaticFiles": "1.0.0"
After saving the files, Visual Studio will start downloading the dependencies.
Now, open Startup.cs file. You will be seeing two methods, ConfigureServices method and Configure method.
Change the ConfigureServices method to the following
public void ConfigureServices(IServiceCollection services)
{
services.AddMvc();
}
Update the Configure method to the following
public void Configure(IApplicationBuilder app, IHostingEnvironment env, ILoggerFactory loggerFactory)
 {
 loggerFactory.AddConsole();
 if (env.IsDevelopment())
 {
 app.UseDeveloperExceptionPage();
 }
 app.UseStaticFiles();
 app.UseMvc(routes =>
 {
 routes.MapRoute(
 name: "default",
 template: "{controller=Home}/{action=Index}/{id?}");
 });

 }
Create Route Controller and View
In an empty ASP.NET Core project, the controller and the view are not created by default. We need to do that manually. Let’s see how that’s done.
Add the Controller
Right click on MyNewProject and then add a new folder. Name the folder Controllers.
Next, add a new item to the Controllers folder. From the Add New Item dialog box, select MVC Controller Class and click on Add.
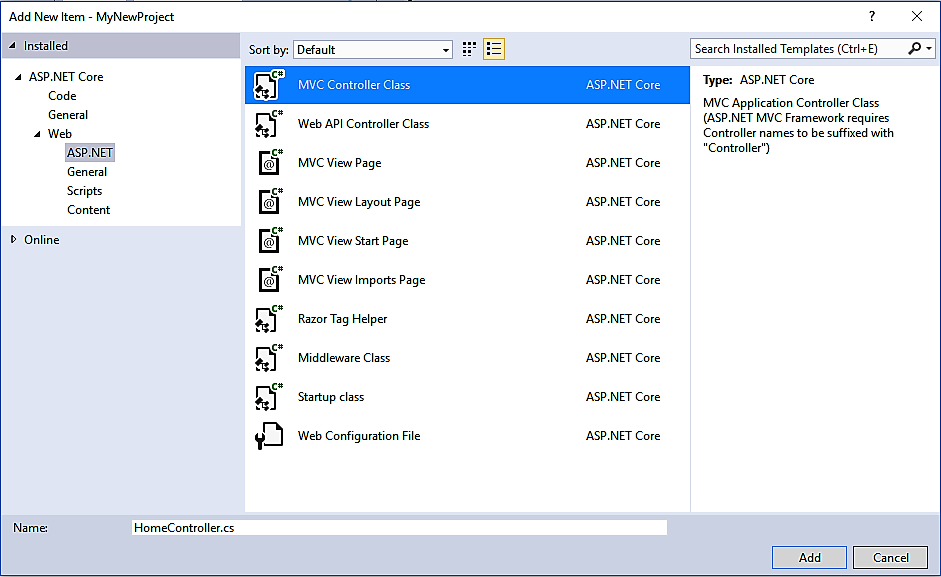
The new file will be created under the folder Controllers and by default, it will be named as HomeControllers.cs
Add the View
Again, right click on MyNewProject and then add another folder. Name the new folder Views.
Under the views folder, we need to add another folder. Right click on Views folder and then add a new folder. Name the folder Home. In the Home subfolder, add a new item.
From the Add New Item dialog box, select the MVC View Page item, and then click Add.
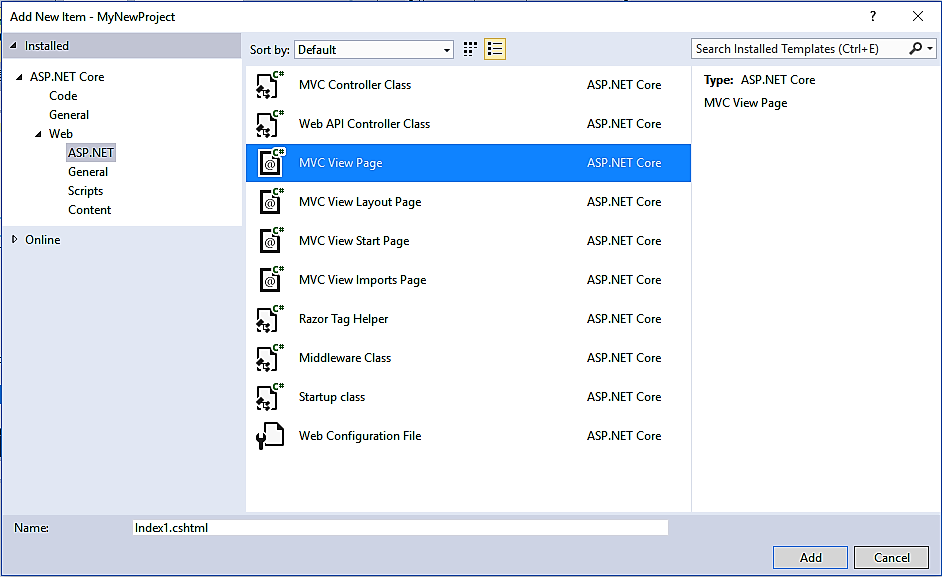
This will add a new folder called Index.cshtml to the Home subfolder.
Creating an MVC Layout Page
All the CSS and JavaScript files are included in a Layout page that enables all the pages to include Bootstrap. So we need to create a Layout page.
First, In the Views folder add a new subfolder called Shared. Within this new subfolder add a new item. In the Add New Item dialog box, select MVC View Layout Page and then click Add.
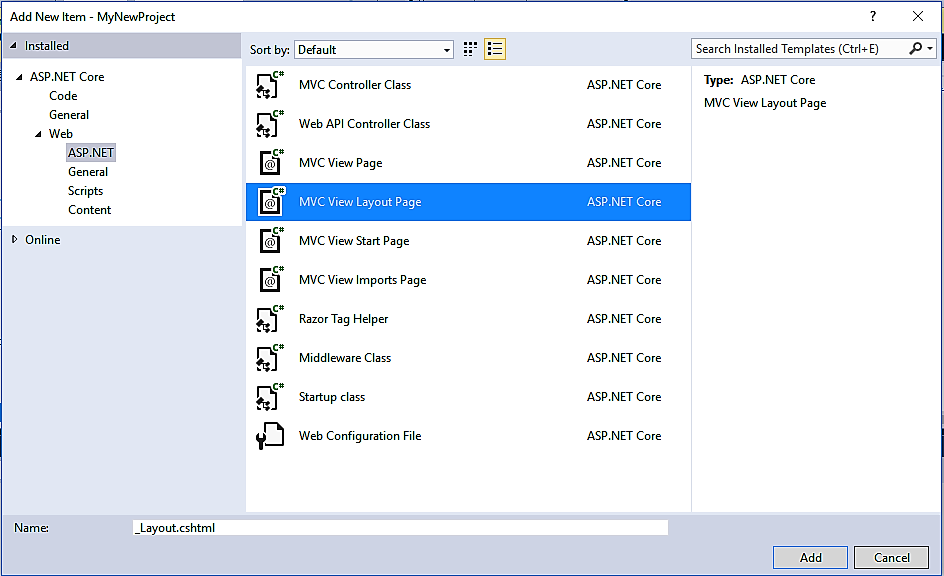
A new file will be added named _Layout.cshtml.
Now, open the _Layout.cshtml file and add the HTML markup to include the CS, JavaScript, and jQuery as below.
@{
    ViewBag.Title = "Bootstrap with ASP.NET";
}
<!DOCTYPE html>

<html>
<head>
    <meta name="viewport" content="width=device-width" />
    <title>@ViewBag.Title</title>
    <link rel="stylesheet" href="~/lib/bootstrap/dist/css/bootstrap.css" />

</head>
<body>

        <div>
            @RenderBody()


        </div>

        <script src="~/lib/jquery/dist/jquery.js"></script>
        <script src="~/lib/bootstrap/dist/js/bootstrap.js"></script>

</body>
</html>
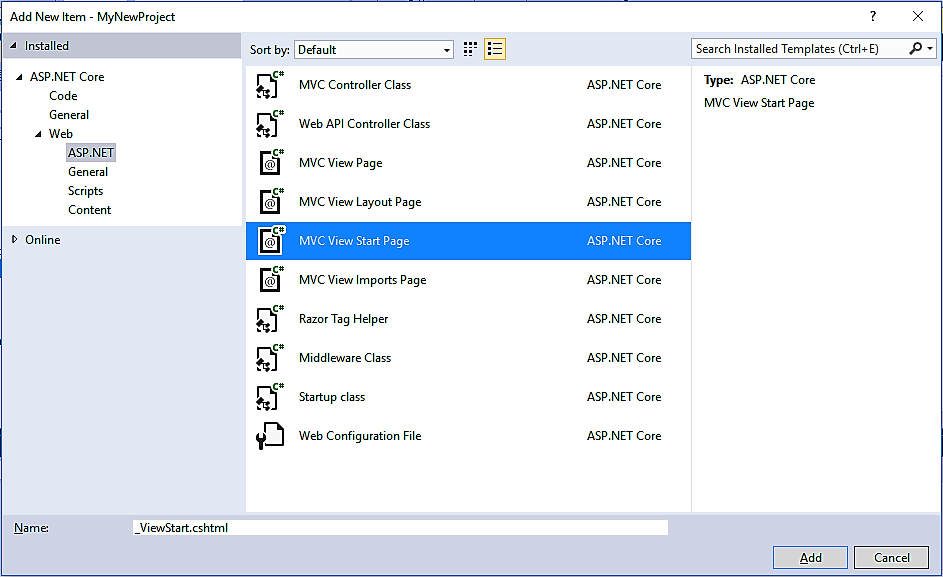
We just not there yet. Add a new item to the Views folder. From the Add New Item dialog box, select MVC View Start Page and then click Add. This will create a new file called _ViewStart.cshtml in the views folder.
In this file, we will specify the common code that is shared by all views.
So, open the file _ViewStart.cshtml and add the following Razor code to the file.
@{
Layout ; "_Layout"
}
Now we can start creating our bootstrap dashboard page using ASP.NET
Create a new file, and you can create pages using Bootstrap components. Let’s Create a simple page that includes a navbar, a Jumbotron, and some other content.
This article explains how to use Bootstrap in ASP.NET Core project. The C# code for connecting the website to the backend of the project is not the purpose of this article but we will be adding those articles as well in the future.