
Introduction
If you are a primarily a backend developer with some basic frontend skills it can be time-consuming and challenging to design a frontend UI to display data that your backend returns but thanks to the free star admin bootstrap template we can save ourselves a lot of work and so we can focus easily on our backend logic.
Prerequisites
To follow along, you’ll need the following:
- A LAMP Stack (you can choose either XAMP, MAMP, WAMP) installed on your machine. The stack you select may be based upon your OS or just your liking. I’ll be using MAMP throughout this tutorial.
- The Star Admin template. You can find it here
- To download and use this template, we’ll need to clone onto our machine from here
Let’s dive in…
About the Application
In this post, we’ll walk through the steps of building an admin panel for a warehouse management system app using PHP, MySQL, and the Star admin Bootstrap template. To keep the app simple, there will be two parts to it:
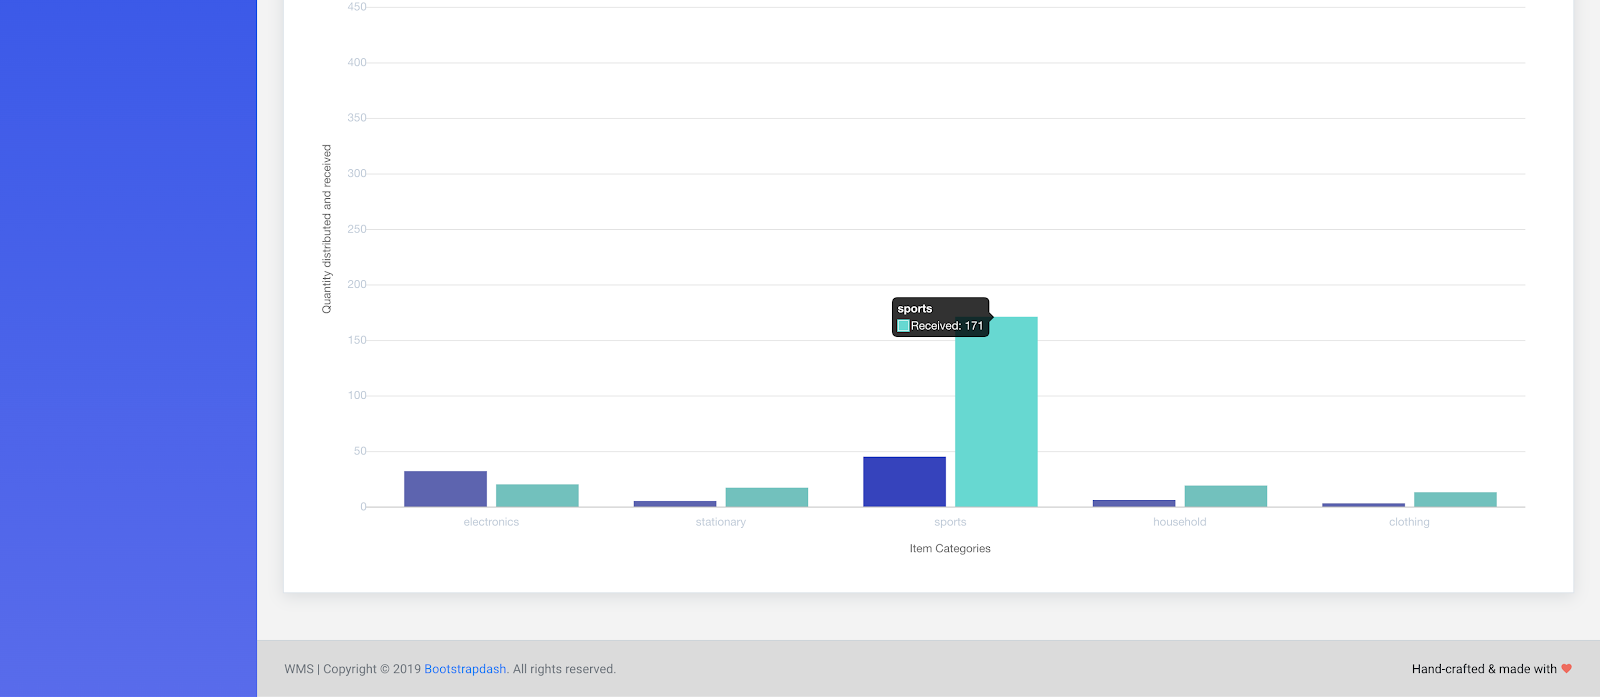
A Dashboard Section and an Inventory management section. In the Inventory management section, As a user, you can Lookup, Add, Edit, Delete inventory items and in the Dashboard section, we’ll take leverage the power of chartJS to that the Stars Admin template comes pre-packed with to Graphically display the number of items for each category and since this a warehouse management app we’ll also represent the total number of inventory items distributed and received for each category (Clothing, Household, Stationery, Electronics, Sports)
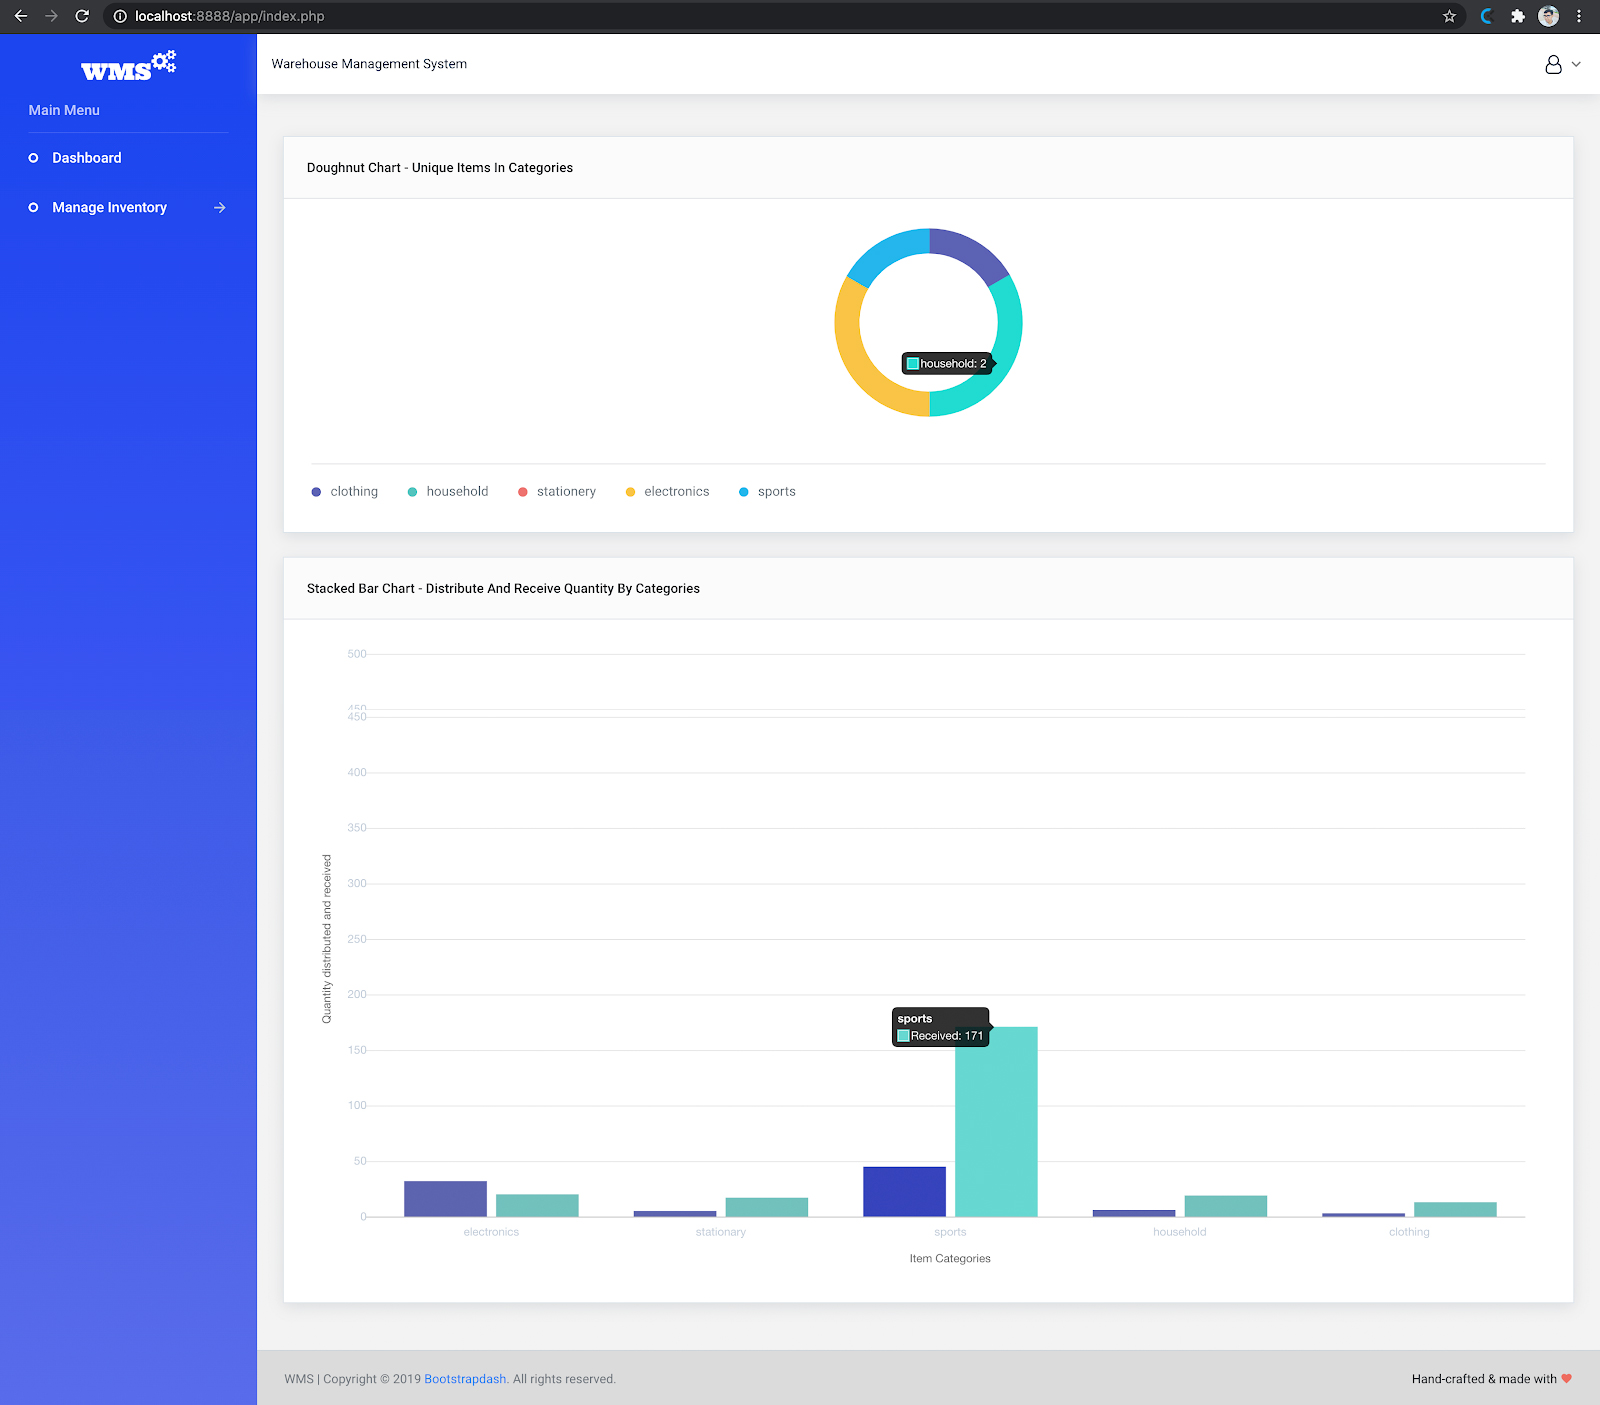
Here’s what the final app would look like:
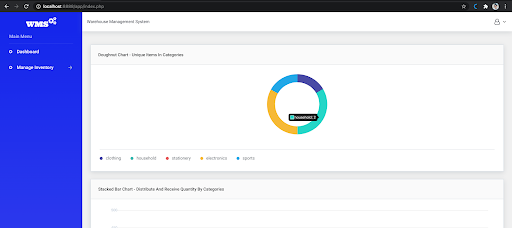
Warehouse Management System App – The Dashboard section
Warehouse Management System App – The Manage Inventory section
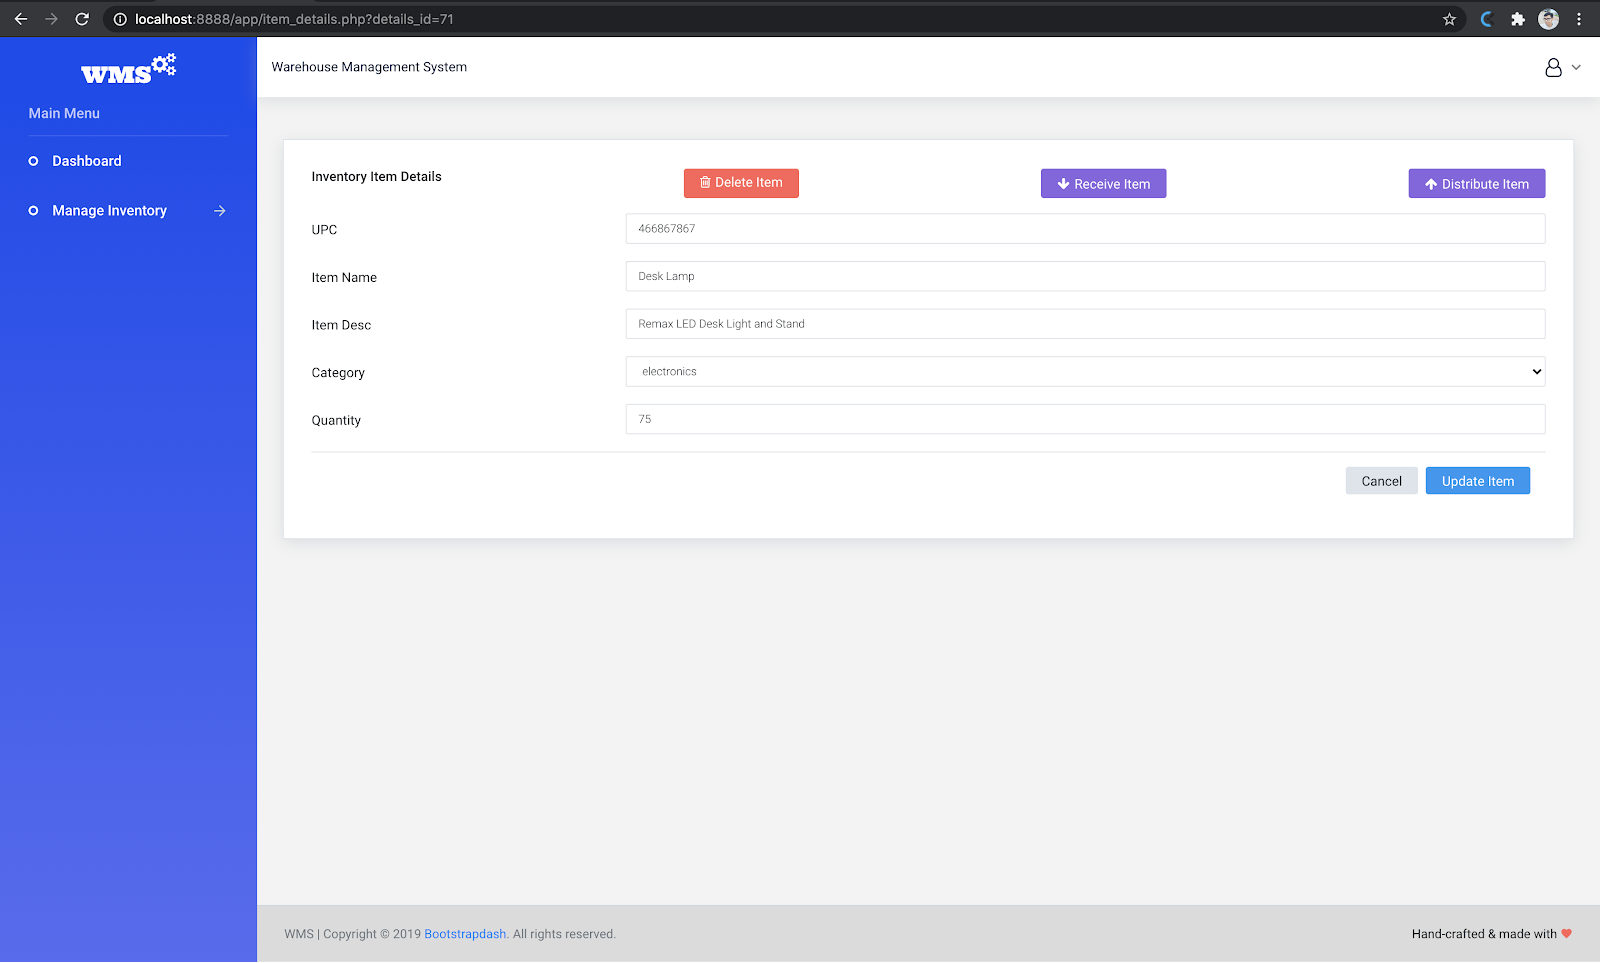
Warehouse Management System App – Item Details (The user gets here by clicking on the detail button from the table shown in the manage inventory section)
Setting up
Getting the free Bootstrap Star admin template
About the Star admin template
The Star Admin template is a free admin template created using Bootstrap 4 which is released under MIT license. This license permits you to download and use the template for any project whether free or commercial.
Let’s go get this template!
- Clone this template to your machine from GitHub (you can clone this to your desktop) https://github.com/BootstrapDash/StarAdmin-Free-Bootstrap-Admin-Template/.
- We’ll return to this soon, let’s move on to setting up our LAMP Stack.
LAMP Stack
- Download the LAMP Stack of your choice as we called out in the Prerequisites section. Each may have different setup instructions that you’ll need to follow.
- Once the LAMP stack is installed (I’ll be using MAMP) locate the htdocs folder
- Create a folder called app within the htdocs folder
Creating the database
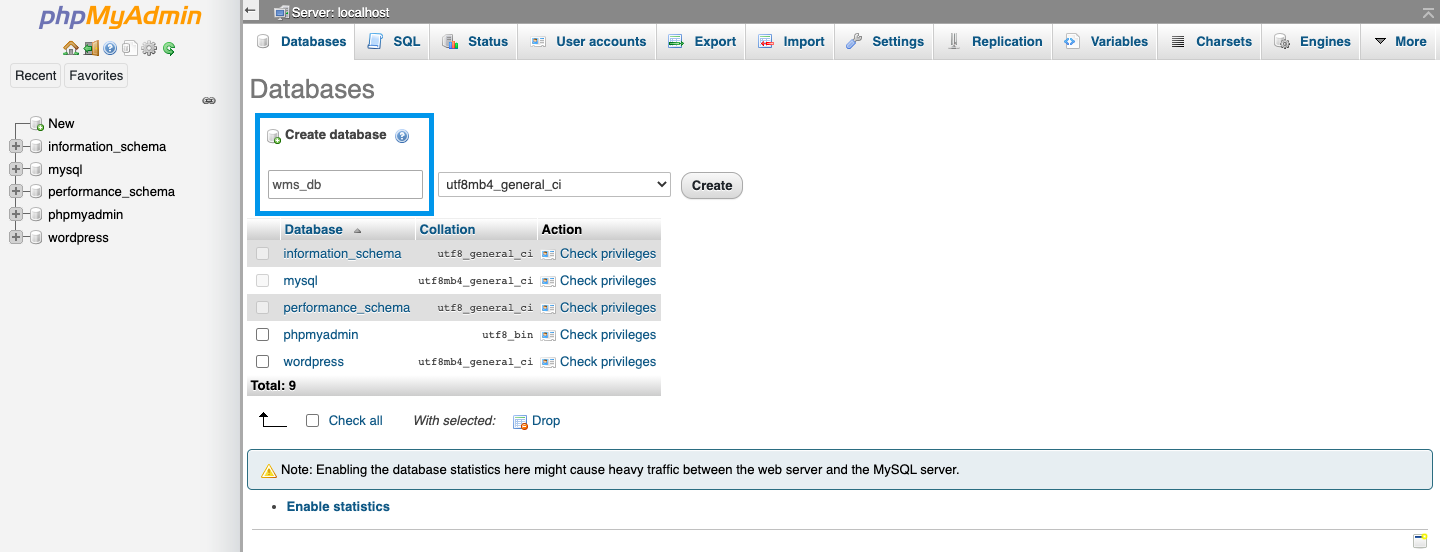
Let us go ahead and create the database that our app will connect to and use. To make this easy on you, I’ve created a .sql file that you can import into phpMyAdmin to create the tables and populate the tables with sample data. Here are the steps:
1. Launch phpMyAdmin
2. Create a new database called wms_db
3. Select the database from the left navigation in phpMyAdmin and click on the import tab
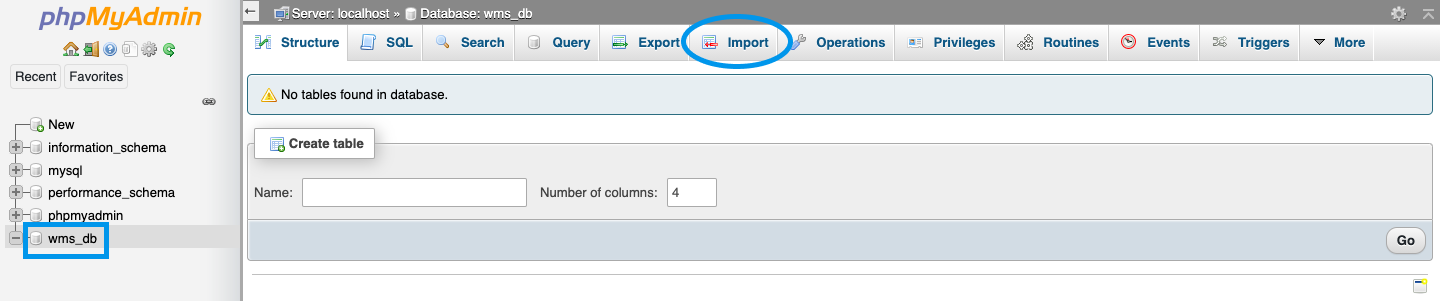
4. Download the following file: wms db.sql then upload it and click on Go.
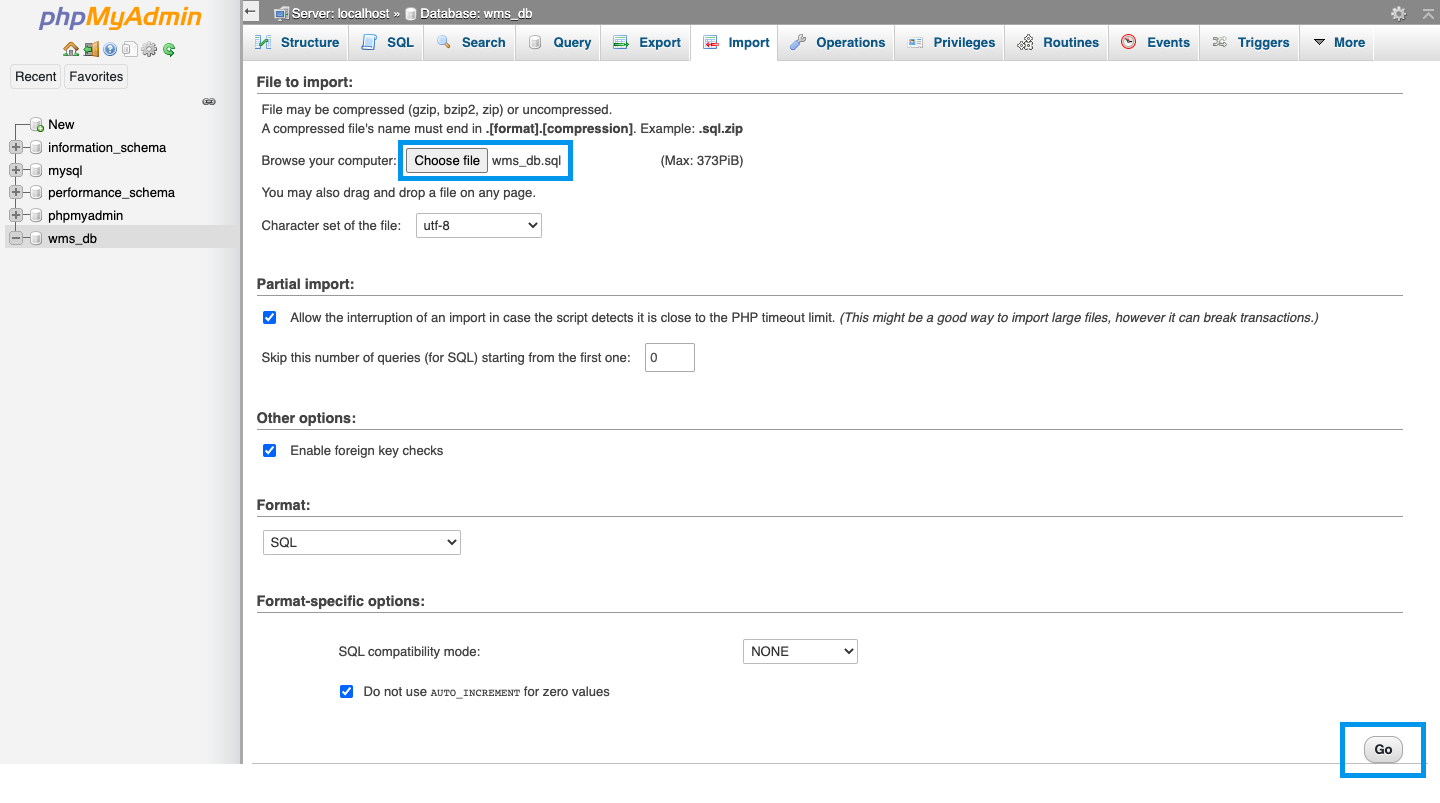
This will import two tables to the wms_db database we created, the inventory_items, and the distribute_receive table.
The inventory_items table will look like:
| id | upc | item_name | item_desc | category | quantity | last_modified |
The distribute_receive table will look like:
| category | distribute_total | receive_total |
And while we are here, let’s add a user account with data and structure rights to our database:
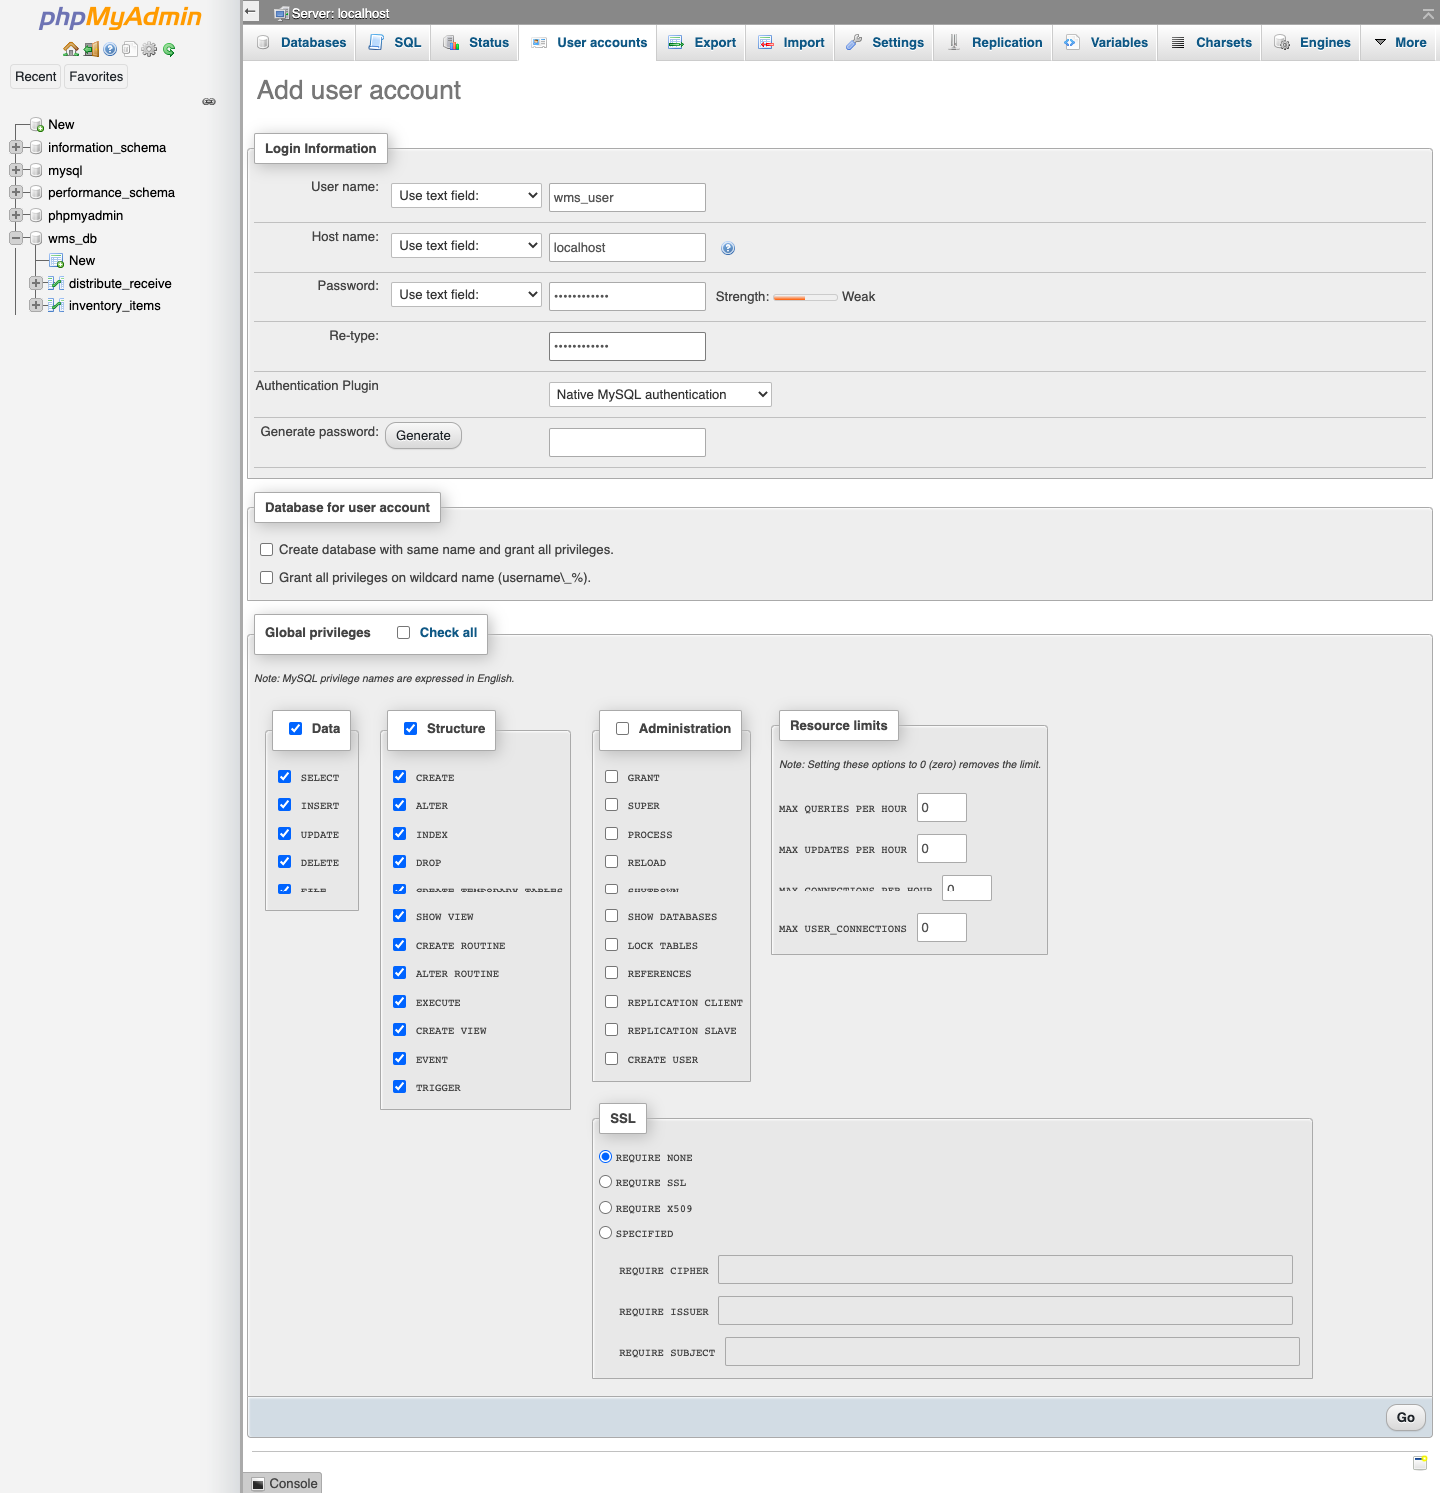
User name: wms_user
Host name: local or localhost
Password: wms_password
Authentication Plugin: Native MySQL authentication
Continuing…
Setting up the project structure
Open up the app folder we added to the htdocs folder and create the following folders and files:
database (folder)
functions (folder)
partials (folder)
index.php (file)
item_details.php (file)
manage_inventory.php (file)
Getting the Star Admin bootstrap template assets
- Next, locate the assets folder from the template repo folder we cloned earlier, you can find it in StarAdmin-Free-BootStrap-Admin-Template/src/
- Copy the assets folder into the app folder that’s found within the htdocs folder
That’s it for the project structure, Let’s get building
Developing the App
By looking at the project structure you can see that we have different files and folders, let’s quickly look at how each of these fit together to create our app and add the necessary files to those folders.
assets
The assets folder includes fonts, CSS, and JavaScript files that support our app’s frontend look and functionality. We’ll just an additional JavaScript file and modify another:
On the manage inventory page, we want to give the user the ability to automatically see search suggestions of the names of inventory items as they begin to type the first letter, this will look something like:
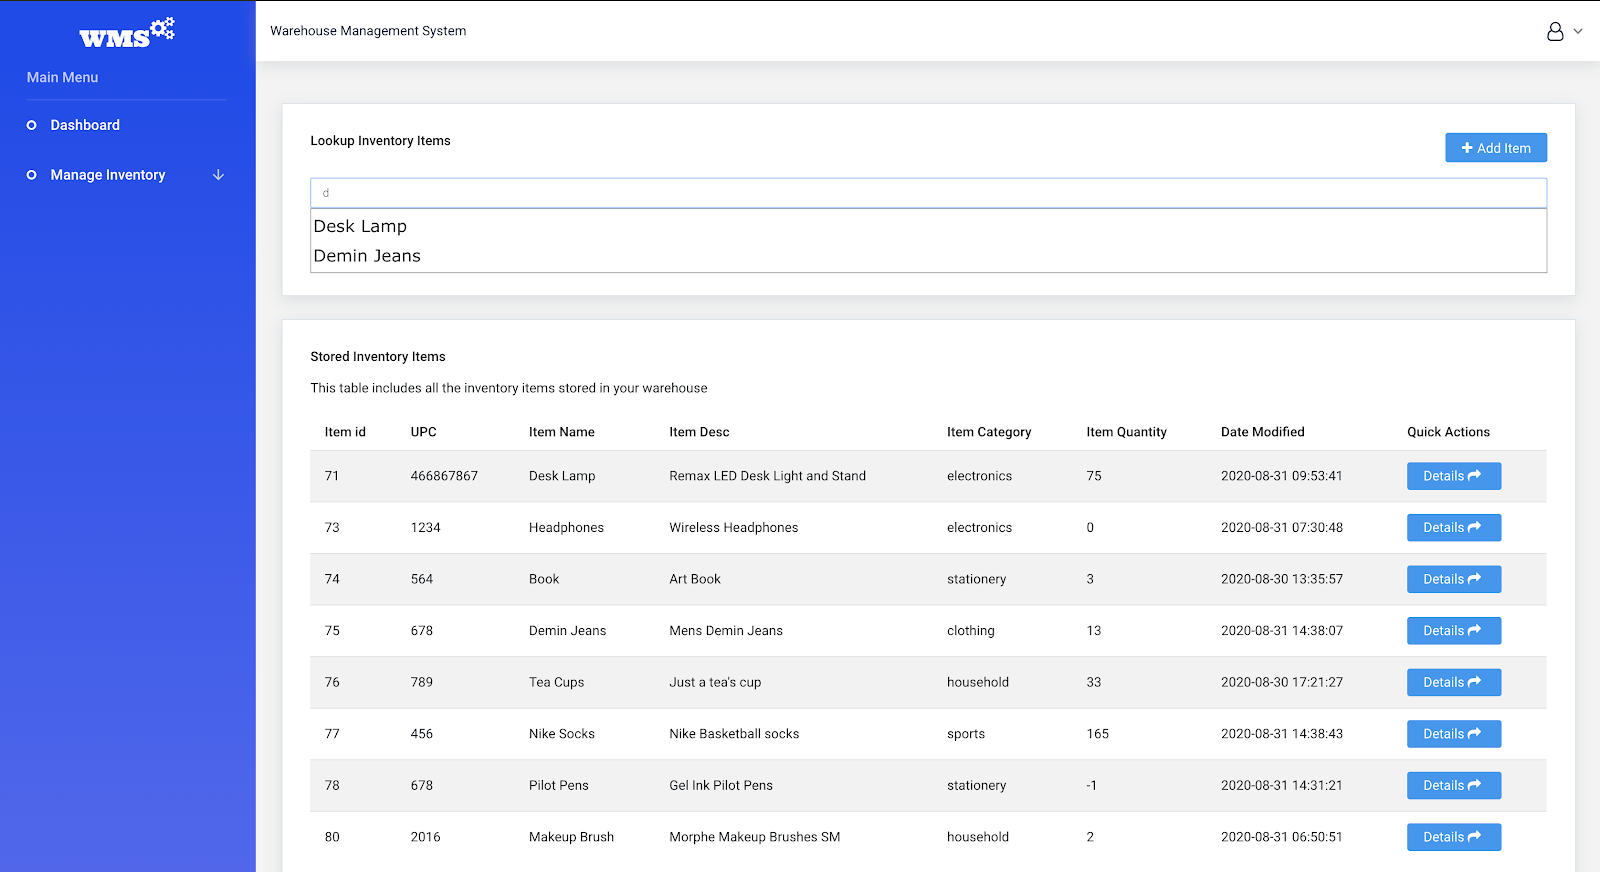
Notice, as the user types the first letter, which is d in this case, suggestions are returned. To implement this feature we have to do three(3) things:
- We’ll need jQuery along with both the CSS and JavaScript for jQuery UI
- Create a PHP file that includes a function that will perform a LIKE lookup of the names of inventory items and return the results.
- Then we’ll need to define a custom javaScript function that will keep listening to the letters as the user types then call the PHP function defined above and then display the suggestions to the user.
Here is how we’ll add this feature:
- The specific jQuery version and the jQueryUI version I’ll be using are as follows
In a later step, we’ll include these, I’ve decided to call these out here for your reference… but the next steps are important to follow
2. Create a file in the functions folder (htdocs/app/functions) called auto_search.php with the following code:
<?php require_once('../database/db_credentials.php'); ?>
<?php
// check if the search term is present in the url
if(isset($_GET['term'])) {
// sanitize the input data and assign variables
$term = filter_var($_GET['term'], FILTER_SANITIZE_STRING);
// make connection to db
$con = mysqli_connect(DB_SERVER, DB_USER, DB_PASS, DB_NAME);
// check for db connection errors
if (mysqli_connect_errno()) {
echo "Failed to connect to MySQL: " . mysqli_connect_error();
exit();
}
// define SQL Query
$sql = "SELECT item_name FROM inventory_items WHERE item_name LIKE '$term%'";
$result = mysqli_query($con, $sql);
// loop over result and assign data to array
while($row = mysqli_fetch_assoc($result)) {
$returned_array[] = $row["item_name"];
}
// return the array in JSON format
if(isset($returned_array)) {
echo(json_encode($returned_array));
}
// close the connection
mysqli_close($con);
}
?>
Whenever this file is called by the javaScript function, it checks if the user has specified a term, then it queries the inventory_items table and returns all the inventory items if their names are similar to the term the user types and return the results in a JSON encoded array that the auto_search.js file can parse and use
3. In the assets/js folder create a JavaScript file called auto_search.js with the following content:
$(function() {
//autocomplete
$(".auto").autocomplete({
source: "functions/auto_search.php",
minLength: 1
});
});
The function in this file gets called automatically when the user types into the input field on the manage inventory page (We’ll get to this later on, but for now, keep this concept in mind). Notice that the contents of the function in this file are very small, the jQueryUI library does the heavy lifting for us. All we have to do is specify the class name of the input field that we want the autocomplete method to be linked to (in this case, this is the input field that the user types into, and this input field has a class name called auto) and add a source which is the auto_seach.php file we created recently and finally we specify the minLenght value which is the minimum amount of letters that input field should contain before we do an item name lookup.
On the Dashboard page, we want to display two charts to the user. The first will be a Doughnut Chart showing the number of unique items in each category, and given that this is a warehouse, The second chart will be a Stacked Bar Chart that shows the total quantity of items distributed and received within their respective categories:
The Good News! our template comes bundled with example charts. I’ve chosen these two charts since they were best suited to represent the data I wanted to be shown but there are many others to take advantage of, see here:
To plug our data into these charts, we’ll use jQuery’s AJAX to grab the data returned from the two PHP files (get_doughnut_chart_data.php and get_stacked_barchart_data.php). Let’s add the charts…
1. Open the assets/js/demo_1/dashboard.js file, do the following:
- Clear the contents of this file
- Then give it the following contents:
(function ($) {

// Doughnut chart
$.ajax({
url: "http://localhost:8888/app/functions/get_doughnut_chart_data.php",
method: "GET",
success: function(data){
var doughnut_chart_labels = [];
var doughnut_chart_data = [];
var json_string = JSON.parse(data);
for (const property in json_string) {
doughnut_chart_labels.push(property);
doughnut_chart_data.push(json_string[property])
}

'use strict';
$(function () {
if ($("#doughnutChart").length) {
var doughnutChartCanvas = $("#doughnutChart").get(0).getContext("2d");
var doughnutPieData = {
datasets: [{
data: doughnut_chart_data,
backgroundColor: [
ChartColor[0],
ChartColor[1],
ChartColor[2],
ChartColor[3],
ChartColor[5],
],
borderColor: [
ChartColor[0],
ChartColor[1],
ChartColor[2],
ChartColor[3],
ChartColor[5]
],
}],

labels: doughnut_chart_labels
};

var doughnutPieOptions = {
cutoutPercentage: 75,
animationEasing: "easeOutBounce",
animateRotate: true,
animateScale: false,
responsive: true,
maintainAspectRatio: true,
showScale: true,
legend: false,

legendCallback: function (chart) {
var text = [];
text.push('<div class="chartjs-legend"><ul>');
for (var i = 0; i < chart.data.datasets[0].data.length; i++) {
text.push('<li><span style="background-color:' + chart.data.datasets[0].backgroundColor[i] + '">');
text.push('</span>');
if (chart.data.labels[i]) {
text.push(chart.data.labels[i]);
}
text.push('</li>');
}
text.push('</div></ul>');
return text.join("");
},
layout: {
padding: {
left: 0,
right: 0,
top: 0,
bottom: 0
}
}
};
var doughnutChart = new Chart(doughnutChartCanvas, {
type: 'doughnut',
data: doughnutPieData,
options: doughnutPieOptions
});
document.getElementById('doughnut-chart-legend').innerHTML = doughnutChart.generateLegend();
}

});

},
error: function(data){},

});

// End doughnut chart

// Stacked bar chart
var stacked_bar_labels = [];
var stacked_bar_distributed_data = [];
var stacked_bar_received_data = [];
$.ajax({
url: "http://localhost:8888/app/functions/get_stacked_barchart_data.php",
method: "GET",
success: function(data){
var newArr = JSON.parse(data);
var arrayLength = newArr.length;
for (var i = 0; i < arrayLength; i++) {
stacked_bar_labels.push(newArr[i].category);
stacked_bar_distributed_data.push(newArr[i].distribute_total);
stacked_bar_received_data.push(newArr[i].receive_total);

}
'use strict';
$(function () {
if ($("#stackedbarChart").length) {
var stackedbarChartCanvas = $("#stackedbarChart").get(0).getContext("2d");
var stackedbarChart = new Chart(stackedbarChartCanvas, {
type: 'bar',
data: {
labels: stacked_bar_labels,
datasets: [{
label: "Distributed",
backgroundColor: ChartColor[0],
borderColor: ChartColor[0],
borderWidth: 1,
data: stacked_bar_distributed_data
},
{
label: "Received",
backgroundColor: ChartColor[1],
borderColor: ChartColor[1],
borderWidth: 1,
data: stacked_bar_received_data
}
]
},
options: {
responsive: true,
maintainAspectRatio: true,
legend: false,
categoryPercentage: 0.5,
stacked: true,
layout: {
padding: {
left: 0,
right: 0,
top: 0,
bottom: 0
}
},
scales: {
xAxes: [{
display: true,
scaleLabel: {
display: true,
labelString: 'Item Categories',
fontSize: 12,
lineHeight: 2
},
ticks: {
fontColor: '#bfccda',
stepSize: 50,
min: 0,
max: 150,
autoSkip: true,
autoSkipPadding: 15,
maxRotation: 0,
maxTicksLimit: 10
},
gridLines: {
display: false,
drawBorder: false,
color: 'transparent',
zeroLineColor: '#eeeeee'
}
}],
yAxes: [{
display: true,
scaleLabel: {
display: true,
labelString: 'Quantity distributed and received',
fontSize: 12,
lineHeight: 2
},
ticks: {
fontColor: '#bfccda',
stepSize: 50,
min: 0,
max: 500,
autoSkip: true,
autoSkipPadding: 15,
maxRotation: 0,
maxTicksLimit: 10
},
gridLines: {
drawBorder: false
}
}]
},
legend: {
display: false
},

legendCallback: function (chart) {
var text = [];
text.push('<div class="chartjs-legend"><ul>');
for (var i = 0; i < chart.data.datasets.length; i++) {
// console.log(chart.data.datasets[i]); // see what's inside the obj.
text.push('<li>');
text.push('<span style="background-color:' + chart.data.datasets[i].backgroundColor + '">' + '</span>');
text.push(chart.data.datasets[i].label);
text.push('</li>');
}
text.push('</ul></div>');
return text.join("");
},
elements: {
point: {
radius: 0
}
}
}
});
document.getElementById('stacked-bar-traffic-legend').innerHTML = stackedbarChart.generateLegend();
}

// End stacked bar chart

});

},
error: function(data){},

});

})(jQuery);
2. Within the functions, folder create two files:
-
- get_doughnut_chart_data.php
- get_stacked_barchart_data.php
-
- Give get_doughnut_chart_data.php the following content:
<?php require_once('../database/db_credentials.php'); ?>

<?php
// make connection to db
$con = mysqli_connect(DB_SERVER, DB_USER, DB_PASS, DB_NAME);
// check for db connection errors
if (mysqli_connect_errno()) {
echo "Failed to connect to MySQL: " . mysqli_connect_error();
exit();
}
// define an array to store the list of categories
$categories = array('clothing', 'household', 'stationery', 'electronics', 'sports');

// loop over array of categories
$count_array = array();
foreach ($categories as $category) {
// define the SQL query to get all the inventory items for each category
$sql = "SELECT * FROM inventory_items WHERE category = '$category'";
if($result = mysqli_query($con, $sql)) {
$rowcount=mysqli_num_rows($result);
$count_array[$category] = $rowcount;
}
}

// encode the array and print the data
echo(json_encode($count_array));

// close the db connection
mysqli_close($con);
?>
2. Give get_stacked_barchart_data.php the following content:
<?php require_once('../database/db_credentials.php'); ?>

<?php
// make connection to db
$con = mysqli_connect(DB_SERVER, DB_USER, DB_PASS, DB_NAME);
// check for db connection errors
if (mysqli_connect_errno()) {
echo "Failed to connect to MySQL: " . mysqli_connect_error();
exit();
}
// define an array to store the data
$data = array();
// define the SQL query to select category, distribute_total, receive_total from the distribute_receive table
$sql = "SELECT category, distribute_total, receive_total FROM distribute_receive";
if($result = mysqli_query($con, $sql)) {
foreach($result as $row) {
$data[] = $row;
}
}
// encode the array and print the data
print(json_encode($data));

// close the db connection
mysqli_close($con);
?>
That’s all it takes for the assets folder…
database
The database is critical to our app, it drives our app. Providing that you followed the setup instructions under the LAMP Stack section, we’ve set up a database for the app called wms_db and imported two tables (inventory_items and dristribute_receive). Apart from this, we added a user account with permissions to the wms_db database. In the database folder create a file called db_credientials.php. This file will include the credentials for connecting to the database that we link to, using the require_once function every time we need to connect to the database, this saves us from typing the credentials in every file that needs access to the database. Give this file the following content:
<?php
define("DB_SERVER", "localhost");
define("DB_USER", "wms_user");
define("DB_PASS", "wms_password");
define("DB_NAME", "wms_db");
?>
partials
A nice feature of PHP is that it allows us to include files as part of another PHP file and the way we can benefit from this is to split parts of an HTML document as components that we can reuse in other files whenever we need to. In this scenario we’ll create these component files and name them accordingly:
- Open the partials folder and create the following files:
- _head.php (underscore head dot PHP)
- _top_navbar.php
- _side_bar.php
- _included_scripts.php
- _footer.php
Here’s what each of the files/components do:
_head.php – This file contains the head of our HTML, that’s basically everything in the <head></head> tag. Add the following code to this file:
 <head>
<!-- Required meta tags -->
<meta charset="utf-8">
<meta name="viewport" content="width=device-width, initial-scale=1, shrink-to-fit=no">
<title>Warehouse Inventory Management</title>
<!-- plugins:css -->
<link rel="stylesheet" href="<?php echo "../app/assets/vendors/iconfonts/mdi/css/materialdesignicons.min.css"?>">
<link rel="stylesheet" href="<?php echo "../app/assets/vendors/iconfonts/ionicons/dist/css/ionicons.css"?>">
<link rel="stylesheet" href="<?php echo "../app/assets/vendors/iconfonts/flag-icon-css/css/flag-icon.min.css"?>">
<link rel="stylesheet" href="<?php echo "../app/assets/vendors/css/vendor.bundle.base.css"?>">
<link rel="stylesheet" href="<?php echo "../app/assets/vendors/css/vendor.bundle.addons.css"?>">
<!-- Jquery UI CSS -->
<link rel="stylesheet" href="http://ajax.googleapis.com/ajax/libs/jqueryui/1.10.1/themes/base/minified/jquery-ui.min.css" type="text/css" />
<!-- endinject -->
<!-- plugin css for this page -->
<link rel="stylesheet" href="<?php echo "../app/assets/vendors/iconfonts/font-awesome/css/font-awesome.min.css"?>">
<!-- End plugin css for this page -->
<!-- inject:css -->
<link rel="stylesheet" href="<?php echo "../app/assets/css/shared/style.css"?>">
<!-- endinject -->
<!-- Layout styles -->
<link rel="stylesheet" href="<?php echo "../app/assets/css/demo_1/style.css"?>">
<!-- End Layout styles -->
<link rel="shortcut icon" href="<?php echo "../app/assets/images/favicon.ico"?>" />
<!-- Google Font -->
<link rel="stylesheet" href="<?php echo "https://fonts.googleapis.com/css2?family=Ultra&display=swap"?>">
</head>
_top_navbar.php – This file contains the HTML code for the top navigation bar.
Add the following code to this file:
<nav class="navbar default-layout col-lg-12 col-12 p-0 fixed-top d-flex flex-row">
<div class="text-center navbar-brand-wrapper d-flex align-items-top justify-content-center">
<a id="navbar-brand" class="navbar-brand brand-logo p-3" href="index.php">
WMS<i class="fa fa-cogs"></i></a>
<a id="navbar-brand" class="navbar-brand brand-logo-mini" href="index.php">
WMS</a>
</div>
<div class="navbar-menu-wrapper d-flex align-items-center">
<ul class="navbar-nav">
<span class="menu-title">Warehouse Management System</span>
</ul>
<ul class="navbar-nav ml-auto">
<li class="nav-item dropdown d-none d-xl-inline-block user-dropdown">
<a class="nav-link dropdown-toggle" id="UserDropdown" href="#" data-toggle="dropdown" aria-expanded="false">
<!-- <img class="img-xs rounded-circle" src="assets/images/faces/face8.jpg" alt="Profile image"> </a> -->
<i class="fa fa-user-o"></i>
<div class="dropdown-menu dropdown-menu-right navbar-dropdown" aria-labelledby="UserDropdown">
<div class="dropdown-header text-center">
<!-- <img class="img-md rounded-circle" src="assets/images/faces/face8.jpg" alt="Profile image"> -->
<p class="mb-1 mt-3 font-weight-semibold">Allen Moreno</p>
<p class="font-weight-light text-muted mb-0">allenmoreno@gmail.com</p>
</div>
<a href="#" class="dropdown-item">Sign Out<i class="dropdown-item-icon ti-power-off"></i></a>
</div>
</li>
</ul>
<button class="navbar-toggler navbar-toggler-right d-lg-none align-self-center" type="button" data-toggle="offcanvas">
<span class="mdi mdi-menu"></span>
</button>
</div>
</nav>
_side_bar.php – This file contains the HTML code for the left sidebar. Add the following code to this file:
<nav class="sidebar sidebar-offcanvas" id="sidebar">
          <ul class="nav">
            <li class="nav-item nav-category">Main Menu</li>
            <li class="nav-item">
              <a class="nav-link" href="index.php">
                <i class="menu-icon typcn typcn-document-text"></i>
                <span class="menu-title">Dashboard</span>
              </a>
            </li>
            <li class="nav-item">
              <a class="nav-link" href="./manage_inventory.php">
                <i class="menu-icon typcn typcn-coffee"></i>
                <span class="menu-title">Manage Inventory</span>
                <i class="menu-arrow"></i>
              </a>
            </li>
          </ul>
        </nav>
_included_scripts.php – This file contains the links to the javaScript libraries and files our app depends on. Add the following code to this file:
<!-- container-scroller -->
<!-- plugins:js -->
<script src="<?php echo "../app/assets/vendors/js/vendor.bundle.base.js"?>"></script>
<script src="<?php echo "../app/assets/vendors/js/vendor.bundle.addons.js"?>"></script>
<!-- endinject -->
<!-- Plugin js for this page-->
<!-- End plugin js for this page-->
<!-- inject:js -->
<script src="<?php echo "../app/assets/js/shared/off-canvas.js"?>"></script>
<script src="<?php echo "../app/assets/js/shared/misc.js"?>"></script>
<!-- endinject -->
<!-- Custom js for this page-->
<script src="<?php echo "../app/assets/js/demo_1/dashboard.js"?>"></script>
<!-- End custom js for this page-->

<!-- Scripts for Auto Search -->
<script type="text/javascript" src="http://code.jquery.com/jquery-1.9.1.min.js"></script>
<script type="text/javascript" src="https://code.jquery.com/ui/1.12.1/jquery-ui.min.js" integrity="sha256-VazP97ZCwtekAsvgPBSUwPFKdrwD3unUfSGVYrahUqU=" crossorigin="anonymous"></script>
<script type="text/javascript" src="<?php echo "../app/assets/js/auto_search.js"?>"></script>
_footer.php – This file contains the footer of our HTML, It’s all the HTML content in the <footer></footer> tag. Add the following code to this file:
<footer class="footer">
<div class="container-fluid clearfix">
<span class="text-muted d-block text-center text-sm-left d-sm-inline-block">WMS | Copyright © 2019 <a href="http://www.bootstrapdash.com/" target="_blank">Bootstrapdash</a>. All rights reserved.</span>
<span class="float-none float-sm-right d-block mt-1 mt-sm-0 text-center">Hand-crafted & made with <i class="mdi mdi-heart text-danger"></i>
</span>
</div>
</footer>
index.php
This file will serve as the default page that the apache web server will direct the user to. This page would be the dashboard page on which our two charts live. Add the following code to this file:
<!DOCTYPE html>
<html lang="en">
<!-- head -->
<?php include "{$_SERVER['DOCUMENT_ROOT']}/app/partials/_head.php";?>
<body>
<div class="container-scroller">
<!-- top navbar -->
<?php include "{$_SERVER['DOCUMENT_ROOT']}/app/partials/_top_navbar.php";?>
<div class="container-fluid page-body-wrapper">
<!-- sidebar nav -->
<?php include "{$_SERVER['DOCUMENT_ROOT']}/app/partials/_sidebar.php";?>
<div class="main-panel">
<div class="content-wrapper">
<!-- Page title header starts -->
<div class="row page-title-header">
<div class="col-md-12">
<div class="page-header-toolbar">
<div class="filter-wrapper">
</div>
</div>
</div>
</div>
<!-- Page title header Ends-->

<!-- Doughnut chart starts -->
<div class="row">
<div class="col-md-12 grid-margin stretch-card">
<div class="card">
<div class="p-4 border-bottom bg-light">
<h4 class="card-title mb-0">Doughnut chart - unique items in categories</h4>
</div>
<div class="card-body">
<div class="d-flex flex-column">
<canvas class="my-auto" id="doughnutChart" height="200"></canvas>
<div class="d-flex pt-3 border-top mt-5">
<div id="doughnut-chart-legend"></div>
</div>
</div>
</div>
</div>
</div>
</div>
<!-- Doughnut chart ends -->

<!-- Stacked bar chart starts -->
<div class="row">
<div class="col-lg-12 grid-margin stretch-card">
<div class="card">
<div class="p-4 border-bottom bg-light">
<h4 class="card-title mb-0">Stacked Bar chart - Distribute and Receive quantity by categories</h4>
</div>
<div class="card-body">
<canvas id="stackedbarChart" style="height:250px"></canvas>
</div>
</div>
</div>
</div>
</div>
<!-- Stacked bar chart ends -->

<!-- content-wrapper ends -->
<!-- footer -->
<?php include "{$_SERVER['DOCUMENT_ROOT']}/app/partials/_footer.php";?>
</div>
<!-- main-panel ends -->
</div>
<!-- page-body-wrapper ends -->
</div>
<?php include "{$_SERVER['DOCUMENT_ROOT']}/app/partials/_included_scripts.php";?>
</body>
</html>
manage_inventory.php
On this page, the user can look up inventory items using the cool autocomplete feature we talked about earlier as the Add Item button and a table that displays all the inventory items we created and stored in our database. Add the following code to this file:
<?php require_once './database/db_credentials.php';?>
<!DOCTYPE html>
<html lang="en">
<!-- head -->
<?php include "{$_SERVER['DOCUMENT_ROOT']}/app/partials/_head.php";?>
<body>
<div class="container-scroller">
<!-- top navbar -->
<?php include "{$_SERVER['DOCUMENT_ROOT']}/app/partials/_top_navbar.php";?>
<div class="container-fluid page-body-wrapper">
<!-- sidebar nav -->
<?php include "{$_SERVER['DOCUMENT_ROOT']}/app/partials/_sidebar.php";?>
<div class="main-panel">
<div class="content-wrapper">
<!-- page title header Starts-->
<div class="row page-title-header">
<div class="col-md-12">
<div class="page-header-toolbar">
<div class="filter-wrapper">
</div>
</div>
</div>
</div>
<!-- page title header ends-->
<?php
// check and alert the user if item was added
if (isset($_GET['add_success'])) {
if ($_GET['add_success'] == 'true') {?>
<div class="alert alert-success alert-dismissible fade show" role="alert">
<strong>Success!</strong> The inventory item was created.
<button type="button" class="close" data-dismiss="alert" aria-label="Close">
<span aria-hidden="true">×</span>
</button>
</div>
<?php } else {?>
<div class="alert alert-danger alert-dismissible fade show" role="alert">
<strong>Error!</strong> There was an error creating the item.
<button type="button" class="close" data-dismiss="alert" aria-label="Close">
<span aria-hidden="true">×</span>
</button>
</div>
<?php }}?>
<?php
// check and alert the user if item was deleted
if (isset($_GET['delete_success'])) {
if ($_GET['delete_success'] == 'true') {?>
<div class="alert alert-success alert-dismissible fade show" role="alert">
<strong>Success!</strong> The inventory item was deleted.
<button type="button" class="close" data-dismiss="alert" aria-label="Close">
<span aria-hidden="true">×</span>
</button>
</div>
<?php } else {?>
<div class="alert alert-danger alert-dismissible fade show" role="alert">
<strong>Error!</strong> There was an error deleting the item.
<button type="button" class="close" data-dismiss="alert" aria-label="Close">
<span aria-hidden="true">×</span>
</button>
</div>
<?php }}?>
<?php
// check and alert the user if item was updated
if (isset($_GET['update_success'])) {
if ($_GET['update_success'] == 'true') {?>
<div class="alert alert-success alert-dismissible fade show" role="alert">
<strong>Success!</strong> The inventory item was updated.
<button type="button" class="close" data-dismiss="alert" aria-label="Close">
<span aria-hidden="true">×</span>
</button>
</div>
<?php } else {?>
<div class="alert alert-danger alert-dismissible fade show" role="alert">
<strong>Error!</strong> There was an error updating the item.
<button type="button" class="close" data-dismiss="alert" aria-label="Close">
<span aria-hidden="true">×</span>
</button>
</div>
<?php }}?>
<?php
// check and alert the user if item was receive
if (isset($_GET['receive_success'])) {
if ($_GET['receive_success'] == 'true') {?>
<div class="alert alert-success alert-dismissible fade show" role="alert">
<strong>Success!</strong> The inventory item was received.
<button type="button" class="close" data-dismiss="alert" aria-label="Close">
<span aria-hidden="true">×</span>
</button>
</div>
<?php } else {?>
<div class="alert alert-danger alert-dismissible fade show" role="alert">
<strong>Error!</strong> There was an error receiving the item.
<button type="button" class="close" data-dismiss="alert" aria-label="Close">
<span aria-hidden="true">×</span>
</button>
</div>
<?php }}?>
<?php
// check and alert the user if item was distributed
if (isset($_GET['distribute_success'])) {
if ($_GET['distribute_success'] == 'true') {?>
<div class="alert alert-success alert-dismissible fade show" role="alert">
<strong>Success!</strong> The inventory item was distributed.
<button type="button" class="close" data-dismiss="alert" aria-label="Close">
<span aria-hidden="true">×</span>
</button>
</div>
<?php } else {?>
<div class="alert alert-danger alert-dismissible fade show" role="alert">
<strong>Error!</strong> There was an error distributing the item.
<button type="button" class="close" data-dismiss="alert" aria-label="Close">
<span aria-hidden="true">×</span>
</button>
</div>
<?php }}?>
<div class="row">
<div class="col-md-12">
<div class="row">
<div class="col-md-12 grid-margin">
<div class="card">
<div class="card-body">
<div class="d-flex justify-content-between mb-3">
<h4 class="card-title">Lookup Inventory Items</h4>
<button data-toggle="modal" data-target="#addItemModal" class="btn btn-primary btn-small"><i class="fa fa-plus"></i>Add Item</button>
</div>
<!-- <p>This table includes all the inventory items stored in your warehouse</p> -->
<form class="ml-auto search-form d-none d-md-block">
<div class="form-group">
<input type="text" name="term" class="auto form-control" placeholder="Start typing to lookup inventory item by name">
<button class="btn btn-primary btn-small mt-3" type="submit" name="submitButton"><i class="fa fa-search"></i>Lookup</button>
</div>
</form>
<?php
// check and return the search results from the lookup form
if (isset($_GET['submitButton'])) {
$term = $_GET['term'];
$con = mysqli_connect(DB_SERVER, DB_USER, DB_PASS, DB_NAME);
if (mysqli_connect_errno()) {
echo "Failed to connect to MySQL: " . mysqli_connect_error();
exit();
}
$sql = "SELECT * FROM inventory_items WHERE item_name LIKE '$term%'";
$search_result = mysqli_query($con, $sql);
mysqli_close($con);
}
?>
<?php if (!empty($search_result)) {?>
<!-- place the lookup search results in a table -->
<div class="table-responsive">
<table class="table table-striped table-hover">
<thead>
<tr>
<th>Item id</th>
<th>UPC</th>
<th>Item Name</th>
<th>Item Desc</th>
<th>Item Category</th>
<th>Item Quantity</th>
<th>Date Modified</th>
<th>Quick Actions</th>
</tr>
</thead>
<tbody>
<?php while ($row = mysqli_fetch_assoc($search_result)) {?>
<tr>
<td> <?php echo ($row['id']); ?> </td>
<td> <?php echo ($row['upc']); ?> </td>
<td> <?php echo ($row['item_name']); ?> </td>
<td> <?php echo ($row['item_desc']); ?> </td>
<td> <?php echo ($row['category']); ?> </td>
<td> <?php echo ($row['quantity']); ?> </td>
<td> <?php echo ($row['last_modified']); ?> </td>
<td>
<a class="btn btn-primary btn-small" href="item_details.php?details_id=<?php echo ($row['id']); ?> ">Details <i class="fa fa-mail-forward"></i></a>
</td>
</tr>
<?php }?>
</tbody>
</table>
</div>
<?php }?>
</div>
</div>
<div class="card mt-4">
<div class="card-body">
<h4 class="card-title">Stored Inventory Items</h4>
<p>This table includes all the inventory items stored in your warehouse</p>
<div class="table-responsive">
<table class="table table-striped table-hover">
<thead>
<tr>
<th>Item id</th>
<th>UPC</th>
<th>Item Name</th>
<th>Item Desc</th>
<th>Item Category</th>
<th>Item Quantity</th>
<th>Date Modified</th>
<th>Quick Actions</th>
</tr>
</thead>
<tbody>
<?php
// get all the inventory items
$con = mysqli_connect(DB_SERVER, DB_USER, DB_PASS, DB_NAME);
if (mysqli_connect_errno()) {
echo "Failed to connect to MySQL: " . mysqli_connect_error();
exit();
}
$sql = "SELECT * FROM inventory_items";
$result = mysqli_query($con, $sql);
mysqli_close($con);
if (isset($result)) {
while ($row = mysqli_fetch_assoc($result)) {?>
<tr>
<td> <?php echo ($row['id']); ?> </td>
<td> <?php echo ($row['upc']); ?> </td>
<td> <?php echo ($row['item_name']); ?> </td>
<td> <?php echo ($row['item_desc']); ?> </td>
<td> <?php echo ($row['category']); ?> </td>
<td> <?php echo ($row['quantity']); ?> </td>
<td> <?php echo ($row['last_modified']); ?> </td>
<td>
<a class="btn btn-primary btn-small" href="item_details.php?details_id=<?php if (isset($row['id'])) {echo ($row['id']);}
;?> ">Details <i class="fa fa-mail-forward"></i></a>
</td>
</tr>
<?php }}?>
</tbody>
</table>
</div>
</div>
</div>
</div>
</div>
</div>
</div>
</div>
<!-- content-wrapper ends -->
<!-- footer -->
<?php include "{$_SERVER['DOCUMENT_ROOT']}/app/partials/_footer.php";?>
</div>
<!-- main-panel ends -->
</div>
<!-- page-body-wrapper ends -->
</div>
<!-- Bootstrap modals -->
<!-- Add Item Modal -->
<div class="modal fade" id="addItemModal" tabindex="-1" role="dialog" aria-labelledby="addItemModal" aria-hidden="true">
<div class="modal-dialog" role="document">
<div class="modal-content">
<div class="modal-header">
<h5 class="modal-title" id="addItemModal">Add Item</h5>
<button type="button" class="close" data-dismiss="modal" aria-label="Close">
<span aria-hidden="true">×</span>
</button>
</div>
<div class="modal-body">
<form class="form-sample" method="GET" action="./functions/add_item.php">
<div class="row">
<div class="col-md-12">
<div class="form-group row">
<label class="col-sm-3 col-form-label">UPC</label>
<div class="col-sm-9">
<input name="item_upc" type="number" class="form-control" required />
</div>
</div>
</div>
<div class="col-md-12">
<div class="form-group row">
<label class="col-sm-3 col-form-label">Item Name</label>
<div class="col-sm-9">
<input name="item_name" type="text" class="form-control" required />
</div>
</div>
</div>
</div>
<div class="row">
<div class="col-md-12">
<div class="form-group row">
<label class="col-sm-3 col-form-label">Item Desc</label>
<div class="col-sm-9">
<input name="item_desc" type="text" class="form-control" required />
</div>
</div>
</div>
<div class="col-md-12">
<div class="form-group row">
<label class="col-sm-3 col-form-label">Category</label>
<div class="col-sm-9">
<select name="item_category" class="form-control" required>
<option value="clothing">Clothing</option>
<option value="household">Household</option>
<option value="stationery">Stationery</option>
<option value="electronics">Electronics</option>
<option value="sports">Sports</option>
</select>
</div>
</div>
</div>
</div>
<div class="row">
<div class="col-md-12">
<div class="form-group row">
<label class="col-sm-3 col-form-label">Quantity</label>
<div class="col-sm-9">
<input name="item_quantity" type="number" class="form-control" required/>
</div>
</div>
</div>
</div>
<div class="modal-footer">
<button type="button" class="btn btn-secondary" data-dismiss="modal">Close</button>
<input type="submit" name="addItemSubmitButton" class="btn btn-primary" value="Add Item">
</div>
</form>
</div>
</div>
</div>
</div>
<?php include "{$_SERVER['DOCUMENT_ROOT']}/app/partials/_included_scripts.php";?>
</body>
</html>
item_details.php
The final core page to our Warehouse Management System app is the item_details page. It shows the user details of an item they selected from the manage inventory page. On this page the user can update details about the item like its: name, description, category, quantity as well as delete the item, distribute the item and receive the item. Add the following code to this file:
<?php require_once('./database/db_credentials.php'); ?>
<!DOCTYPE html>
<html lang="en">
<!-- head -->
<?php include("{$_SERVER['DOCUMENT_ROOT']}/app/partials/_head.php");?>
<body>
<div class="container-scroller">
<!-- top navbar -->
<?php include("{$_SERVER['DOCUMENT_ROOT']}/app/partials/_top_navbar.php");?>
<!-- partial -->
<div class="container-fluid page-body-wrapper">
<!-- sidebar nav -->
<?php include("{$_SERVER['DOCUMENT_ROOT']}/app/partials/_sidebar.php");?>
<div class="main-panel">
<div class="content-wrapper">
<!-- page title header starts-->
<div class="row page-title-header">
<div class="col-md-12">
<div class="page-header-toolbar">
<div class="filter-wrapper">
</div>
</div>
</div>
</div>
<!-- page title header ends-->
<?php
if(isset($_GET['delete_success'])) {
if($_GET['delete_success'] == 'true') { ?>
<div class="alert alert-success alert-dismissible fade show" role="alert">
<strong>Success!</strong> The inventory item was deleted.
<button type="button" class="close" data-dismiss="alert" aria-label="Close">
<span aria-hidden="true">×</span>
</button>
</div>
<?php } else { ?>
<div class="alert alert-danger alert-dismissible fade show" role="alert">
<strong>Error!</strong> There was an error deleting the item.
<button type="button" class="close" data-dismiss="alert" aria-label="Close">
<span aria-hidden="true">×</span>
</button>
</div>
<?php } } ?>
<?php
if(isset($_GET['details_id'])){
$id = $_GET['details_id'];
$con = mysqli_connect(DB_SERVER, DB_USER, DB_PASS, DB_NAME);
if (mysqli_connect_errno()) {
echo "Failed to connect to MySQL: " . mysqli_connect_error();
exit();
}
$sql = "SELECT * FROM inventory_items WHERE id = '$id' LIMIT 1";
$search_result = mysqli_query($con, $sql);
$row = mysqli_fetch_assoc($search_result);
mysqli_close($con);
}
?>
<div class="row">
<div class="col-md-12">
<div class="row">
<div class="col-md-12 grid-margin">
<div class="card">
<div class="card-body">
<div class="d-flex justify-content-between mb-3">
<h4 class="card-title">Inventory Item Details</h4>
<a href="./functions/delete_item.php?delete_id=<?php echo($id);?>" class="btn btn-danger btn-small"><i class="fa fa-trash-o"></i>Delete Item</a>
<button data-toggle="modal" data-target="#receiveItemModal" class="btn btn-info btn-small"><i class="fa fa-arrow-down"></i>Receive Item</button>
<button data-toggle="modal" data-target="#distributeItemModal" class="btn btn-info btn-small"><i class="fa fa-arrow-up"></i>Distribute Item</button>
</div>
<form class="form-sample" method="GET" action="update_item.php">
<div class="row">
<div class="col-md-12">
<div class="form-group row">
<label class="col-sm-3 col-form-label">UPC</label>
<div class="col-sm-9">
<input name="item_id" type="number" class="form-control" value="<?php if(isset($row['id'])){echo($row['id']);} ?>" hidden />
<input name="item_upc" type="number" class="form-control" value="<?php if(isset($row['upc'])){echo($row['upc']);} ?>" required />
</div>
</div>
</div>
<div class="col-md-12">
<div class="form-group row">
<label class="col-sm-3 col-form-label">Item Name</label>
<div class="col-sm-9">
<input name="item_name" type="text" class="form-control" value="<?php if(isset($row['item_name'])){echo($row['item_name']);} ?>" required />
</div>
</div>
</div>
</div>
<div class="row">
<div class="col-md-12">
<div class="form-group row">
<label class="col-sm-3 col-form-label">Item Desc</label>
<div class="col-sm-9">
<input name="item_desc" type="text" class="form-control" value="<?php if(isset($row['item_desc'])){echo($row['item_desc']);} ?>" required />
</div>
</div>
</div>
<div class="col-md-12">
<div class="form-group row">
<label class="col-sm-3 col-form-label">Category</label>
<div class="col-sm-9">
<select name="item_category" class="form-control" required>
<option selected value="<?php if(isset($row['category'])){echo($row['category']);}?>"><?php if(isset($row['category'])){echo($row['category']);}?></option>
<option value="clothing">Clothing</option>
<option value="household">Household</option>
<option value="stationery">Stationery</option>
<option value="electronics">Electronics</option>
<option value="sports">Sports</option>
</select>
</div>
</div>
</div>
</div>
<div class="row">
<div class="col-md-12">
<div class="form-group row">
<label class="col-sm-3 col-form-label">Quantity</label>
<div class="col-sm-9">
<input name="item_quantity" type="number" class="form-control" value="<?php if(isset($row['quantity'])){echo($row['quantity']);} ?>" required/>
</div>
</div>
</div>
</div>
<div class="modal-footer">
<a href="manage_inventory_page.php" type="button" class="btn btn-secondary">Cancel</a>
<input type="submit" name="updateItemSubmitButton" class="btn btn-primary" value="Update Item">
</div>
</form>
</div>
</div>
</div>
</div>
</div>
</div>
</div>
<!-- content-wrapper ends -->
<!-- footer -->
<?php include("{$_SERVER['DOCUMENT_ROOT']}/app/partials/_footer.php");?>
</div>
<!-- main-panel ends -->
</div>
<!-- page-body-wrapper ends -->
</div>
<!-- bootstrap modals -->
<!-- receive item modal -->
<div class="modal fade" id="receiveItemModal" tabindex="-1" role="dialog" aria-labelledby="receiveItemModal" aria-hidden="true">
<div class="modal-dialog" role="document">
<div class="modal-content">
<div class="modal-header">
<h5 class="modal-title" id="receiveItemModal">Receive Item</h5>
<button type="button" class="close" data-dismiss="modal" aria-label="Close">
<span aria-hidden="true">×</span>
</button>
</div>
<div class="modal-body">
<form class="form-sample" method="GET" action="./functions/receive_item.php">
<div class="row">
<div class="col-md-12">
<div class="form-group row">
<label class="col-sm-4 col-form-label">Quantity Received</label>
<div class="col-sm-8">
<input name="item_id" type="number" class="form-control" value="<?php if(isset($row['id'])){echo($row['id']);} ?>" hidden />
<input name="item_category" type="text" class="form-control" value="<?php if(isset($row['category'])){echo($row['category']);} ?>" hidden />
<input name="item_quantity" type="number" class="form-control" value="<?php if(isset($row['quantity'])){echo($row['quantity']);} ?>" hidden/>
<input name="quantity_received" type="number" class="form-control" required/>
</div>
</div>
</div>
</div>
<div class="modal-footer">
<button type="button" class="btn btn-secondary" data-dismiss="modal">Close</button>
<input type="submit" name="receiveItemSubmitButton" class="btn btn-primary" value="Receive Item">
</div>
</form>
</div>
</div>
</div>
</div>
<!-- Distribute Item Modal -->
<div class="modal fade" id="distributeItemModal" tabindex="-1" role="dialog" aria-labelledby="distributeItemModal" aria-hidden="true">
<div class="modal-dialog" role="document">
<div class="modal-content">
<div class="modal-header">
<h5 class="modal-title" id="distributeItemModal">Distribute Item</h5>
<button type="button" class="close" data-dismiss="modal" aria-label="Close">
<span aria-hidden="true">×</span>
</button>
</div>
<div class="modal-body">
<form class="form-sample" method="GET" action="./functions/distribute_item.php">
<div class="row">
<div class="col-md-12">
<div class="form-group row">
<label class="col-sm-4 col-form-label">Quantity to Distribute</label>
<div class="col-sm-8">
<input name="item_id" type="number" class="form-control" value="<?php if(isset($row['id'])){echo($row['id']);} ?>" hidden />
<input name="item_category" type="text" class="form-control" value="<?php if(isset($row['category'])){echo($row['category']);} ?>" hidden />
<input name="item_quantity" type="number" class="form-control" value="<?php if(isset($row['quantity'])){echo($row['quantity']);} ?>" hidden/>
<input name="quantity_distributed" type="number" class="form-control" required/>
</div>
</div>
</div>
</div>
<div class="modal-footer">
<button type="button" class="btn btn-secondary" data-dismiss="modal">Close</button>
<input type="submit" name="distributeItemSubmitButton" class="btn btn-primary" value="Distribute Item">
</div>
</form>
</div>
</div>
</div>
</div>
<!-- Edit Item Modal -->
<div class="modal fade" id="editItemModal" tabindex="-1" role="dialog" aria-labelledby="editItemModal" aria-hidden="true">
<div class="modal-dialog" role="document">
<div class="modal-content">
<div class="modal-header">
<h5 class="modal-title" id="editItemModal">Edit Item</h5>
<button type="button" class="close" data-dismiss="modal" aria-label="Close">
<span aria-hidden="true">×</span>
</button>
</div>
<div class="modal-body">
...
</div>
<div class="modal-footer">
<button type="button" class="btn btn-secondary" data-dismiss="modal">Close</button>
<button type="button" class="btn btn-primary">Update Item</button>
</div>
</div>
</div>
</div>
<?php include("{$_SERVER['DOCUMENT_ROOT']}/app/partials/_included_scripts.php");?>
</body>
</html>
I know you must be excited to test that the app, there is one more folder we need to add contents for…
functions
The function folder would contain all the PHP functions that are necessary for the app to make Database queries to add, update, delete, and retrieve data.
Open the folder and create the following files and remember that we added three other PHP files in earlier steps (auto_search.php, get_dougnut_chart_data.php, get_stacked_barchart_data.php)
- add_item.php
- update_item.php
- delete_item.php
- distribute_item.php
- receive_item.php
To help you better understand the code and logic in these files, I’ve added code comments.
add_item.php – The code in this file will be called whenever we add a new inventory item to the inventory_items table in the wms_db database. Add the following code to this file:
<?php require_once('../database/db_credentials.php'); ?>
<?php
// check if the form was submitted
if(isset($_GET['addItemSubmitButton'])){
// check if the user filled out all the fields
if(isset($_GET['item_upc']) && isset($_GET['item_name']) && isset($_GET['item_desc']) && isset($_GET['item_category']) && isset($_GET['item_quantity'])) {
// sanitize the input data and assign variables
$item_upc = filter_var($_GET['item_upc'], FILTER_SANITIZE_STRING);
$item_name = filter_var($_GET['item_name'], FILTER_SANITIZE_STRING);
$item_desc = filter_var($_GET['item_desc'], FILTER_SANITIZE_STRING);
$item_category = filter_var($_GET['item_category'], FILTER_SANITIZE_STRING);
$item_quantity = filter_var($_GET['item_quantity'], FILTER_SANITIZE_STRING);
// make connection to db
$con = mysqli_connect(DB_SERVER, DB_USER, DB_PASS, DB_NAME);
// check for db connection errors
if (mysqli_connect_errno()) {
echo "Failed to connect to MySQL: " . mysqli_connect_error();
exit();
}
// define SQL query
$sql = "INSERT INTO inventory_items (upc, item_name, item_desc, category, quantity) VALUES ('$item_upc', '$item_name', '$item_desc', '$item_category', '$item_quantity')";
$new_url = '../manage_inventory.php?add_success=true';
// if the record was successfully added
if (mysqli_query($con, $sql)) { header('Location: '.$new_url);

} else {
// if the record failed to be added
$new_url = '../manage_inventory.php?add_success=false';
header('Location: '.$new_url);
}
// close the db connection
mysqli_close($con);
}

}
?>
update_item.php – The code in this file will be called whenever we need to update the details of an inventory item in the inventory_items table in the wms_db database. Add the following code to this file:
<?php require_once('./database/db_credentials.php'); ?>
<?php
// check if the form was submitted
if(isset($_GET['updateItemSubmitButton'])){
// check if the user filled out sll the fields
if(isset($_GET['item_id']) && isset($_GET['item_upc']) && isset($_GET['item_name']) && isset($_GET['item_desc']) && isset($_GET['item_category']) && isset($_GET['item_quantity'])) {
// sanitize the input data and assign variables
$item_id = filter_var($_GET['item_id'], FILTER_SANITIZE_STRING);
$item_upc = filter_var($_GET['item_upc'], FILTER_SANITIZE_STRING);
$item_name = filter_var($_GET['item_name'], FILTER_SANITIZE_STRING);
$item_desc = filter_var($_GET['item_desc'], FILTER_SANITIZE_STRING);
$item_category = filter_var($_GET['item_category'], FILTER_SANITIZE_STRING);
$item_quantity = filter_var($_GET['item_quantity'], FILTER_SANITIZE_STRING);
// make connection to db
$con = mysqli_connect(DB_SERVER, DB_USER, DB_PASS, DB_NAME);
// check for db connection errors
if (mysqli_connect_errno()) {
echo "Failed to connect to MySQL: " . mysqli_connect_error();
exit();
}

// define the SQL query to update the item in the inventory_items table
$sql = "UPDATE inventory_items SET upc='$item_upc', item_name='$item_name', item_desc='$item_desc', category='$item_category', quantity='$item_quantity' WHERE id=$item_id";

// if the record was successfully updated
if (mysqli_query($con, $sql)) {
$new_url = 'manage_inventory_page.php?update_success=true';
header('Location: '.$new_url);

} else {
// if the record failed to be updated
$new_url = 'manage_inventory_page.php?update_success=false';
header('Location: '.$new_url);

}
// close the db connection
mysqli_close($con);
}

}
?>
delete_item.php – The code in this file will be called whenever we need to update the details of an inventory item in the inventory_items table in the wms_db database. Add the following code to this file:
<?php require_once('../database/db_credentials.php'); ?>
<?php
// check if the delete id is present in the url
if(isset($_GET['delete_id'])){
// sanitize the input data and assign variables
$id = filter_var($_GET['delete_id'], FILTER_SANITIZE_STRING) ;
// make connection to db
$con = mysqli_connect(DB_SERVER, DB_USER, DB_PASS, DB_NAME);
// check for db connection errors
if (mysqli_connect_errno()) {
echo "Failed to connect to MySQL: " . mysqli_connect_error();
exit();
}
// define SQL query
$sql = "DELETE FROM inventory_items WHERE id = $id";
$new_url = '../manage_inventory.php?delete_success=true';
// if the record was successfully deleted
if (mysqli_query($con, $sql)) { header('Location: '.$new_url);

} else {
// if the record failed to be deleted
$new_url = '../manage_inventory.php?delete_success=false';
header('Location: '.$new_url);

}
// close the connection
mysqli_close($con);
}
?>
distribute_item.php – The code in this file affects two tables in our database when it is called. When a user distributes an item, imagine that every time the user distributes the item from the warehouse in the real world it gets taken off the shelves and sent to a store. To mimic this, on the item details page (item_details.php) when the user clicks on distribute item, this triggers a modal or a popup that the user can enter the quantity for that item they wish to distribute. When the user submits the form, we update the number of items distributed under the category for the item the user is distributing. Just a refresher, the distribute_receive database table looks like:
| category | distribute_total | receive_total |
| electronics | 5 | 10 |
Then we subtract from the quantity for that item in the inventory_items table the amount the user is distributing. Add the following code to this file:
<?php require_once('../database/db_credentials.php'); ?>
<?php
// check if the form was submitted
if(isset($_GET['distributeItemSubmitButton'])){
// check if the user filled out all the fields
if(isset($_GET['item_id']) && isset($_GET['item_category']) && isset($_GET['item_quantity']) & isset($_GET['quantity_distributed'])) {
// sanitize the input data and assign variables
$item_id = filter_var($_GET['item_id'], FILTER_SANITIZE_STRING);
$item_category = filter_var($_GET['item_category'], FILTER_SANITIZE_STRING);
$item_quantity = filter_var($_GET['item_quantity'], FILTER_SANITIZE_STRING);
$quantity_distributed = filter_var($_GET['quantity_distributed'], FILTER_SANITIZE_STRING);
// make connection to db
$con = mysqli_connect(DB_SERVER, DB_USER, DB_PASS, DB_NAME);
// check for db connection errors
if (mysqli_connect_errno()) {
echo "Failed to connect to MySQL: " . mysqli_connect_error();
exit();
}

// define the SQL query to check if the category already exist
$sql_check = "SELECT * FROM distribute_receive WHERE category='$item_category'";

if ($result = mysqli_query($con, $sql_check) ) {
// if the query executes successfully, get the row count
$rowcount=mysqli_num_rows($result);
// check if a category exist by counting the rows returned from the db
if($rowcount) {
// if the category exist in the database update the distributed quantity
$sql_update_distribute_quantity = "UPDATE distribute_receive SET distribute_total=distribute_total+'$quantity_distributed' WHERE category='$item_category'";
mysqli_query($con, $sql_update_distribute_quantity);
}
else {
// if the category does not exist in the database then insert the row
$sql_insert_row = "INSERT INTO distribute_receive (category, distribute_total, receive_total) VALUES ('$item_category', '$quantity_distributed', '0')";
mysqli_query($con, $sql_insert_row);
}

}
// adjust (subtract the distributed amount) the quantity from the inventory_items table
$sql_update_quantity = "UPDATE inventory_items SET quantity=quantity-'$quantity_distributed' WHERE id=$item_id";

// if the record was successfully updated
if (mysqli_query($con, $sql_update_quantity)) {
$new_url = '../manage_inventory.php?distribute_success=true';
header('Location: '.$new_url);

} else {
// if the record failed to be updated
$new_url = '../manage_inventory.php?distribute_success=false';
header('Location: '.$new_url);

}
// close the db connection
mysqli_close($con);
}

}
?>
receive_item.php – similar to how the code in distribute_item.php works, the code in this file does the opposite. When an item is received (keep in mind that an inventory item must be added before it can be received) the received total for the category that item belongs to gets updated in the distribute_receive table and then the quantity of the item in the inventory_items table gets adjusted so we add the quantity that the user is receiving to the quantity of the item available. Add the following code to this file:
<?php require_once('../database/db_credentials.php'); ?>
<?php
// cehck if the form was submitted
if(isset($_GET['receiveItemSubmitButton'])){
// check if the user filled out all the fields
if(isset($_GET['item_id']) && isset($_GET['item_category']) && isset($_GET['item_quantity']) && isset($_GET['quantity_received'])) {
// sanitize the input data and assign variables
$item_id = filter_var($_GET['item_id'], FILTER_SANITIZE_STRING);
$item_category = filter_var($_GET['item_category'], FILTER_SANITIZE_STRING);
$item_quantity = filter_var($_GET['item_quantity'], FILTER_SANITIZE_STRING);
$quantity_received = filter_var($_GET['quantity_received'], FILTER_SANITIZE_STRING);
// make connection to db
$con = mysqli_connect(DB_SERVER, DB_USER, DB_PASS, DB_NAME);
// check for db connection errors //
if (mysqli_connect_errno()) {
echo "Failed to connect to MySQL: " . mysqli_connect_error();
exit();
}

// define the SQL query to check if the category already exist
$sql_check = "SELECT * FROM distribute_receive WHERE category='$item_category'";

if ($result = mysqli_query($con, $sql_check) ) {
// if the query executes successfully, get the row count
$rowcount=mysqli_num_rows($result);
// check if a category exist by counting the rows returned from the db
if($rowcount) {
// if the category exist in the database update the distributed quantity
$sql_update_receive_quantity = "UPDATE distribute_receive SET receive_total=receive_total+'$quantity_received' WHERE category='$item_category'";
mysqli_query($con, $sql_update_receive_quantity);
}
else {
// if the category does not exist in the database then insert the row
$sql_insert_row = "INSERT INTO distribute_receive (category, distribute_total, receive_total) VALUES ('$item_category', '0', '$quantity_received')";
mysqli_query($con, $sql_insert_row);
}

}
// adjust (subtract the received amount) the quantity from the inventory_items table
$sql_update_quantity = "UPDATE inventory_items SET quantity=quantity+'$quantity_received' WHERE id=$item_id";

// if the record was successfully updated
if (mysqli_query($con, $sql_update_quantity) ) {
$new_url = '../manage_inventory.php?receive_success=true';
header('Location: '.$new_url);

} else {
// if the record failed to be added
$new_url = '../manage_inventory.php?receive_success=false';
header('Location: '.$new_url);

}
// close the db connection
mysqli_close($con);
}

}
?>
Testing the WMS admin panel we’ve built
Now that we’ve completed adding all the code and explaining what each one does, you can go ahead launch the app in your browser by starting up you LAMP Stack server and navigating to the app folder that we’ve added into the htdocs folder at the beginning of this tutorial:
Also Read : Why Laravel Is Considered as the Best PHP Framework of 2020
Comments(1)
Tiago pereira ramos
October 9, 2020
Alguém consegue usar o botão de upload de arquivos?